Showing posts with label sewing. Show all posts

Thursday, November 6, 2014

mini Captain America

This is probably the last Halloween that I can officially choose Joshie's costume without any input from him, so I made it a good one: Captain America!

The forecast for October looked chilly this year, and the trick-or-treating night proved cool and damp, indeed. I planned his costume to be cozy, using his snow boots and warm fleece pants. I put him in a thermal shirt and cozy socks, and used his navy blue fleece zip-up hoodie to complete the cozy. He absolutely loved holding "Daddy's" hand and running up to each door with his best buddy, JoJo. He quickly learned how to say "Trick-or-treat" and "Happy Halloween" and did a great job.

I ransacked our drawers for the right t-shirt material colors to make the stripey portions and the essential Captain America shield. Luckily, one of Brad's old undershirts, one of my red tank tops, and a royal blue onesie from the too-small, too-old-to-wear pile were just the right colors to use for the project. 

I made a "pinny" of sorts out of the undershirt, first, so that I could pull it on over Joshie's coat. I then used strips of red to make the stripes, sewing right onto the pinny.

The star was made of more undershirt material, but I first attached interfacing to make it stiffer. I then sewed around the shape of the star, cut it out, and cut it in half. I attached it to either side of the zipper on the fleece hoodie, using large stitches to make it easy to remove later. The letter "A" on the hood was made using the same process.

For the shield, I used a frisbee and traced a circle onto the red tank top fabric that was about 3" larger all around. I then made a channel to thread elastic through, and set that circle aside. I added two white circles and a blue one, with a final star in the center to complete the look. I threaded the elastic through the red fabric and stretched it over the frisbee. Hooray, a shield! I added two pieces of elastic to the back of the shield so that Joshie could wear it on his arm or his back.

Here's the whole look:


The red snow plow is an essential part of getting out the door. We always bring a tractor, truck, or ball when we go out!


"app-eee ah-ween!" "tick uh teet!!" says Joshua. :)

Monday, November 3, 2014

baby girl frills

I've been dreaming of putting flowers and bows and sparkly accessories on my baby girl since the first moment I found out about her!

A few weeks ago, I picked up some fold-over elastic at Jo-Ann Fabrics and tucked it into my sewing box. It really has taken this long for me to make it to the actual crafting stage. Life with a toddler, friends! It's beautiful, messy, full, crazy, hard, wonderful, and too busy most days for crafting.

But, today, I did a little bit.

Behold, the polka dot and floral cuteness:

Also, ignore the poor quality phone photo. This is life, currently - can't always pick up my nice camera!

What do you think? I can't wait to put it on my sweet baby girl!

Friday, May 2, 2014

short sleeves for spring

My mother-in-law loves to dote on her grandson. This makes me a happy momma, indeed!

Last week, we stopped in at a local children's resale shop, and she picked up a haul of great deals for Joshua to enjoy this spring and summer! A couple pairs of shorts, a Fisher Price bubble mower, and their everyday 10 onesies for $10 deal.

Four of the onesies happened to be long sleeved, and that's not so suitable for spring, right? But I had an idea...

...and I made them into short sleeved onesies!

You may remember that I wrote a silly little lament for my sewing machine. The machine is still out of commission, but a good friend of mine let me borrow her (new in the box!) machine for my little project. So generous! It was a dream to sew on such an easy-to-use, smooth machine. Everything went so perfectly. Thank you, Dena!

I cut off the sleeve at the length I wanted the finished sleeve to be. I used an existing short sleeved shirt of Joshua's to be sure it was a good length.

Then, I cut off the original shirt sleeve cuffs, turned them inside out, and fitted them over the newly-shortened sleeve so that the raw edges lined up.

Lastly, I stretched the fabric out and sewed straight-line stitches to reattach the "new" sleeve cuffs. Turned them back to the right side, trimmed threads, and there we go!
Cute? I think so! I'm pleased and happy to have some "new" play clothes for my little boy! Thanks, "Grandma!"

Friday, September 27, 2013

darning in action

Quite a while ago, I wrote a little tutorial on how to fix knit garments that get holes in them. I showed you a mitten and a glove, and said that you could use the same process to fix most any kind of knit article you care to keep.

Today, I pulled out one of Joshua's hand-me-down shirts, only to find that there was a small hole in the back. It's a really cute polo shirt, so it made perfect sense for me to just darn it!

Here's the finished project:
I believe that you can click on the picture to see it larger.


Let me know if you try fixing any of your holey clothes or accessories, and show me how they turn out!

Incidentally, this is my 300th post on this blog. I didn't realize I had so much to say! It has meant a lot to me to be able to put my "pen to paper" and to process my thoughts this way. Thank you for your encouragement, kind words, and thoughts as I share my life with you like this! I hope that you are also encouraged and inspired as you read.

Sunday, May 19, 2013

Joshua's baby dedication

Joshua was dedicated in our church today! That means that we, as his parents, promised to live our lives in a way that helps him to see the difference that Jesus makes to us, and that we'll consistently teach him about Jesus. It also means that our church family promised to help us as we walk this journey as parents, and as Joshua grows up.


Here is the letter I wrote for Joshua to read someday, when he's old enough to understand:


5/19/13, 5 months and two weeks
Dear Joshua,
This morning was your dedication to the Lord! We are so thankful for you, our son. We brought you to the 9:00am service at Grace Road Church in Rochester, where we’ve been attending for the past year. You always seem to love the music and the many faces we see each time. Your Grandma and Grandpa Burr and your Nana and Grandpa Landin were able to be there, and they were so excited to see you! 

You snuggled with Grandma Burr for much of the service, and you enjoyed hanging out with Grandpa Landin and Nana when you woke up. Pastor Kevin preached from Mark 12:35-44, and reminded us that following Jesus means to lay down our whole lives and to trust his leadership. You wore an adorable outfit that Nana Landin made for you, complete with a cute little hat. 
 
You were so well behaved, smiling and cooing as we arrived, falling asleep during the sermon (in Grandma Burr’s arms), and waking up happily, just in time for your dedication and the final songs. 
 
We sang “How Great Thou Art,” “All the Poor and Powerless,” “Oh, Our Lord,” (both by the group All Sons and Daughters) and “In Christ Alone.” (Getty & Townend) We had delicious cake after church, too! Your Daddy read this in church this morning as we dedicated you:

"Since we found out about you, we've prayed that God would make you a strong leader for his kingdom, like your biblical namesake. We pray that you'll always follow God's leading and trust Him completely. We love your frequent smiles and your boundless energy; may you use both to encourage and strengthen those in need. 

We hope that you'll see in us not just how much we love you, but that we love Jesus. We pray that as we teach and guide you that we will give you grace, just as we have been given boundless grace through Christ Jesus. May our words and actions clearly show you how to live for Him. 

We hope that our marriage displays love, faithfulness, forgiveness and integrity as we seek to honor God with our commitment to each other and to our family. "


We love you, baby Joshua!

Friday, April 12, 2013

a mini celebration of spring

We've had our first warm Western New York spring day! And I do really mean warm - it was in the 60's and sunny, which is cause for celebration.

What is this warm weather you speak of? All I know is snow!
So, I just couldn't resist dressing the little guy in something cute and summery, and was so excited that this cute little outfit that I made fits him already!

I could get used to warm weather...
Isn't he adorable? Wearing Daddy's shirts already. :o)

Monday, August 20, 2012

sewing for Baby

You already know that I like to reuse and repurpose fabric - often a thrifted vintage sheet or pillow case, and sometimes, cast-off clothing.

This weekend, I pulled out a much-loved and much-worn (and too small in the neck) short-sleeved dress shirt that belonged to the resident daddy-to-be, and turned it into a play suit for our little boy!
First, I traced a 6-month sized outfit from our slowly growing stash of clothing for the little guy:
Isn't this a cute little outfit? It will be perfect for Memorial Day!
 I then measured sides, arm holes, and leg openings and used a ruler to square up my lines. I traced a coaster to get the right curve for the neck, since the neckline on the red outfit was different than what I was wanting for this one, and then measured a 1/2" seam allowance around the entire pattern. I folded the pattern in half so that I could cut it out on the fold instead of taking a chance and having mismatched sides.

Then, I cut the dress shirt open at the seams, across the back yoke, and around the collar. I cut off the sleeves and set them aside for a future little project. I ironed the easy-care no-iron fabric, which just made life a little easier. I first cut from what was once the back of the shirt, moving the pattern to one side so that I could save as much fabric as possible. The great thing I discovered about this woven dress shirt fabric is that it's the same on the right side and the wrong side. Sweet. I then used the opened up back piece, centering it on the front button placket, pinned, and cut out the front piece.

First, I determined how many buttons I wanted to actually be able to use. Three seemed sufficient, so I sewed over the existing seams to close the button placket at the bottom.
It almost looks like a zipper fly.  I then finished the leg openings with an easy rolled hem (sew 1/4" from the edge, press toward the wrong side, fold up and press again toward the wrong side, and then sew 1/4" seam to finish).
There's the little "fly" for the little guy's outfit!
Next, I sewed the front and back pieces together - just up the sides and across the shoulders, avoiding arm and leg holes - with the wrong sides together, using a scant 1/4" seam. I then turned the outfit inside out and carefully pressed the seams.

Working on the wrong side of the fabric, I sewed the same sides and shoulders again, just a little bit bigger than 1/4" from the finished seam. This enclosed the raw edges of the fabric so that nothing will be itchy on Baby's soft skin. Then I pressed the seams toward the front side and sewed them down, again just a scant 1/4" from the finished edge. This is called a French seam, by the way. You'll see this kind of seam in really nice dress shirts - check the side seams! Here is a good tutorial, if you'd like to try this kind of seam on your next project.
Here's the inside of the French seam. Click on the picture to see it better!
Next, I had to re-trim the armhole openings because of my zeal in seaming the sides. Alas.

Then, I used this tutorial to make bias tape out of the remaining shirt pieces. I then trimmed the neck, armholes, and crotch opening with my snazzy matching bias tape.


Sigh. Then I had to wait, because I didn't yet have snaps. But yesterday, I picked some up! Hubby was impressed with my use of a hammer as I fastened the little snaps to the outfit. I love that he's proud of what I do.
And now it's done!!
What do you think? Little guy wearing Daddy's clothes - I love it!


I'm linking up at Sew Much Ado's "We Did It! Wednesday." Go check out what other people have made, too!


Sunday, July 29, 2012

refashion

use it up,
wear it out,
make it do,
or do without.


For much of my life, this has been the theme. Buying new was the lesser choice when there was a thrift store, and repurposing or reusing was more highly esteemed than spending hard-earned cash. Garage sale-ing was an event! Even my little brother, according to my mom's anecdote, wouldn't wear the new clothes that Nanny bought for him because, "these can't be mine;" he was used to our brother's broken-in hand-me-downs.This attitude has come in handy in these first four years of my married life, as we have very little in the way of extra pennies.

I've come to love thrifting, creating-from-thrifted-stuff, plain-old-creating, and finding new uses for stuff. For instance, there's a cotton tablecloth covering a mismatched armchair, rather than me paying close to $90 for a new slipcover. There's my full-length mirror that my parents found at a garage sale, whose adjustable angle is held in place by a ribbon tied across the bottom of the oval frame. (you can see that ingenuity in the picture below) There's a ribbon tied to my pull-on overhead light fixture so that I can reach it. There's a clip-on desk lamp above my apartment kitchen sink instead of built-in under-cabinet lighting. I'm currently using a couple of picnic baskets, one on top of the other (neither of them new), to make a night stand for my side of the bed. So many of my clothes are second hand that it feels special, even extravagant, to buy something brand-new. I love vintage dishes, for more reasons than just because they can be less expensive to buy.

Not that I don't recognize quality, or want really nice things. I treasure the beautiful jewelry from my grandmother, the china I got for wedding presents, and my J. Crew jeans (second hand, of course). It would be awesome to have under-cabinet lighting in the kitchen, matching new furniture that's my style, and all of the latest fashionable clothing. It would be really convenient to have a light switch for that pull-on light by my dresser.

But that's not where we are right now. Right now, we find the best things we can at the best prices we can - even if it's not the most convenient. We wait for the right thing to come at the right price, sometimes to my husband's chagrin. Sometimes he does want me to just buy it new. :o)

All of this to say: I've done it again!

Back in May, at the end-of-year community free swap, I got a really soft J. Crew t-shirt in a men's size medium, much like this one. It's a nice, light blue color, with a couple of stains - a bleach stain on the v-neck, and a small stain on the shoulder. I was pretty sure hubby wouldn't want it, so tonight, I cut it up...

...and now, it's an XS flutter-sleeve maternity shirt! Hooray!
First, I folded it in half down the middle - sleeves together, and the v-neck matching up in the front. I lined it up with another one of my v-neck shirts that's nicely fitted around the bust, and cut a bit off of the sides, including cutting off the sleeves. I then cut the excess fabric off the sleeves, and cut off the hem on the sleeves. I sewed up the sides of the shirt, re-attached the sleeves (backwards, though, so that they'd be fluttery), and ta-da! I have a new shirt.

Friday, January 13, 2012

Darn. Or, On Fixing Things.

Use it up,
Wear it out,
Make it do,
Or do without.

Good advice, yes? Being on a budget that's less than what I was accustomed to is an adjustment. I'm sure you know how this feels. While we're in this place, and really, throughout our lives, it just makes sense to practice things like Using All the Leftovers, Not Buying Ridiculous Numbers of Sweaters, Dealing With Imperfect Furniture, and Living Without "Essentials" Like T.V. You're probably also couponing, meal planning, freezing, canning, green-cleaning, and creatively stretching your funds in ways I haven't thought of! Do share, by the way!

This is one reason I enjoy looking to the past, embracing my vintage Pyrex collection, appreciating the excellent craftsmanship of vintage fabrics, and picking up other various useful household items that once had a life somewhere else, in another Time. They're often better made, have ingenious uses, and are just plain lovely.

In that same spirit, I want to share with you today How to Darn.

Yes, that's a legitimate use of the word. Darn! It's a verb.

When our great-grandmothers spent long hours knitting socks, sweaters, and other clothing items, throwing away wasn't an option. Instead of getting rid of a sock or sweater or hat or whatever that had a hole, they would fix it and keep using it, not unlike how we patch a pair of beloved jeans. This technique also works on jeans and woven fabrics. Just be sure to have a heavy needle and thread ready!

I have a pair of light lavender/pink cashmere gloves, and the thumbs have worn really thin, to the point of creating holes. I also have a beautiful pair of gray wool cabled mittens from my Grandma, which are so loved that their thumbs have holes, too. Sad day:
 
Here's how I fixed them, and how you can fix (almost) any other holey knit item.

1. Find a long length of a similar color thread or thin yarn, and thread a needle.

2. Observe the pattern of the fabric. See the little V's all stacked on each other like a chevron pattern? Excellent. In between each half of a V is a horizontal thread. If you stretch the fabric, you'll be able to see these horizontal threads making a ladder-like pattern.

3. Starting about 2" away from the hole, begin to weave your thread over-under-over-under the horizontal ladder threads, hiding it between the halves of the V's. Like this:


If you're working with something small, like a glove or sock, it's helpful to put something inside - your hand in the glove, or an old incandescent light bulb in the sock - to be sure you're not picking up fabric on the opposite side of the garment. Women of old actually had a wooden darning tool shaped much like a light bulb...

4. As you approach the hole or weak area in the fabric, draw the thread straight across to the other side of the hole, being careful not to pull it too tightly. You want the fabric to continue to lie flat, without rippling it.

5. Change directions, working so that you have many vertical lines of thread crossing the weak area or hole. Like this:

6. Now, begin to work horizontally, weaving the thread over-under-over-under the new threads you've added and the existing threads (if there are any). Like this:
Continue working until the entire hole is covered, or until the weak area is strengthened.
7. Halfway there!
8. Rather than tying a knot in the thread (which can add unnecessary bulk to the fabric), find another column of V's and weave it in and out of the horizontal ladder threads for about 2". Cut the tail of the thread close to the work, being Very Careful not to cut the fabric.

Done darning, darling!

9. Admire your work and continue to use your favorite gloves, hat, mittens, scarf, sweater, whatever - in the knowledge that you not only saved some money, but that you have a connection to your history, and to people of all times.

On the gray mittens, I used yarn on one thumb, and thread on the other. Both blend in well - you decide what you like best for each project!
On the lavender pink gloves, you'll notice that the left thumb is puckering a little. This is not because it's extra flirty, but because I pulled the threads too tight: a word of caution. It still fits just fine, but isn't perfect. Just like me. :o)
Well, what are you waiting for? Go fix your favorite knits!

Friday, January 6, 2012

more vintage sheets!

My mom and my sister came to visit me yesterday! It was a lovely, full day - tea party, cupcakes, lunch, shopping, puzzle-ing, dinner - with many hugs in between. I'm so glad they came!

In our shopping adventures, we went thrifting (of course). I got an almost-new fleece half-zip pullover by Columbia, and I picked up two vintage sheets. Surprise!

Both twin-size sheets are my favorite No-Iron Percale, 50% cotton, 50% polyester. I'm seeing a couple of aprons for my sisters-in-law, maybe a crib-sized baby blanket (quilted, perhaps? I've been wanting to try...), possibly a summery skirt for me - but right now, they look like happy tablecloths draped across my table!

Norah seems to approve of the $2.99 price tag. The other sheet was just $1.50. So great - I couldn't buy the amount of fabric for that little, and I love it!

I also had a little time this week to do some sewing. My sewing machine was fixed, thanks to my husband's aunt and mother, who took it to a reputable shop in their area. I made a little something to thank my MIL:
...a sleep mask.
It has fleece on the back, with this pretty black-and-white toile on the front.
Do you think she'll like it? I hope so!

Friday, August 19, 2011

lament for a sewing machine c. 1980-2011

heavy steel, delicate thread
well-oiled parts, clean and sharp
just enough give and take

quiet years, dusty case
easily replaced, old and dull
almost forgotten

opened box, new notions
new-found friend, light and use
a chance to assist and create

one, two, three, more
inspired projects, peace and delight
a passion and pastime

halted work, crunched grip
knotted thread, tight and pulled
too much to take

patient hands, labored, slow
restored function, not quite right
back in the box


--------------

All that to say, I'm really frustrated that my sewing machine is not working properly. I can't do any projects until it's fixed or until I have a new one. Just in time for school to start, right? I guess that can't distract me anymore. Studies, here I come. Sad face.

Update 9/25/11: The sewing machine has made its way to the shop. Hoping that it doesn't cost a whole lot, and that it works again soon! In the meantime, I have my MIL's old workhorse of a sewing machine in case I want to sew...correction, if I have time to sew!

Saturday, August 13, 2011

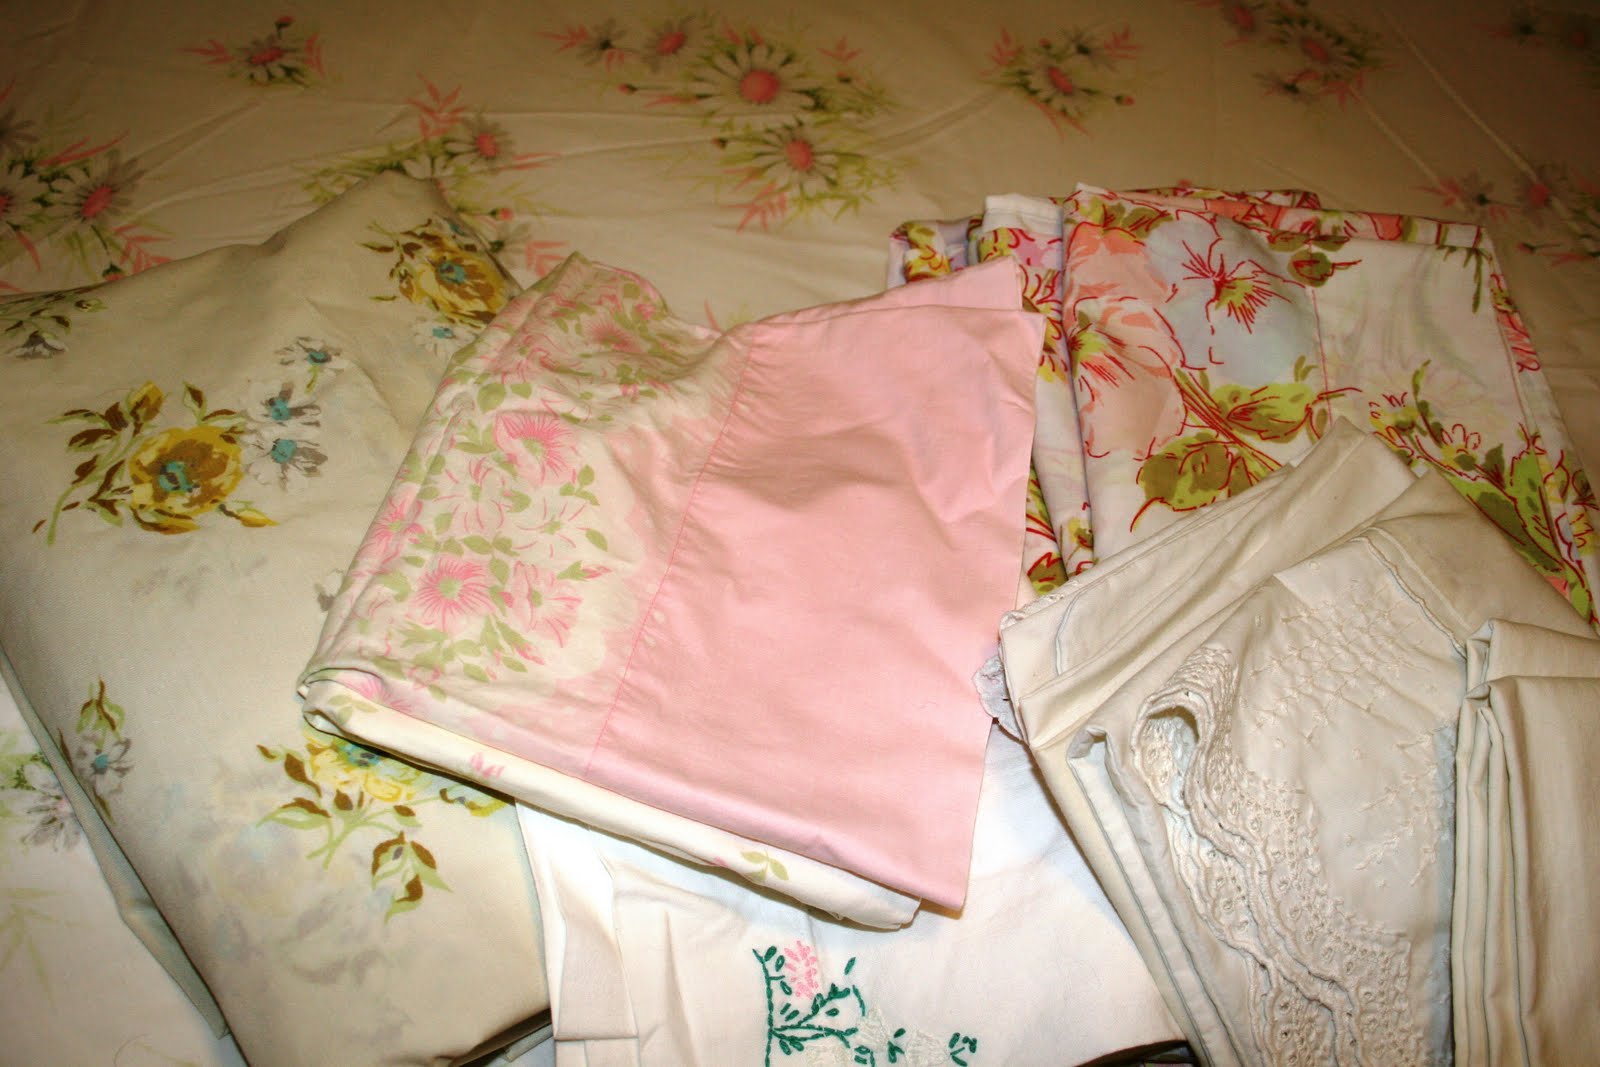
vintage sheet collection

I have a few collections. We've already discussed my extensive sweater collection, and the beginnings of a Pyrex collection. On display today: my vintage sheet collection.
Why vintage sheets? The older sheets are often 100% cotton percale, very smooth fabric, softer than my 500 thread count brand-new sheets. The designs are pretty. They're not sateen, so they don't pill. The fabric is useful for things other than sheets. And they're inexpensive, especially when found at thrift stores! The only downside? Most sheets are sized for a double bed. This does not deter me from purchasing them, though! Besides, we own a full size air mattress. A flat double sheet can be tucked onto a queen size mattress (just barely), and a second flat sheet on top works just fine. It does mean that there's a little less sheet to go around, though. Most of my sheets have been purchased separately from each other. I have three distinct color patterns of this daisy print sheet (all double size) - two pink flat (one faded pink), one blue flat, and one gray fitted sheet. These are gracing the guest room bed right now, since my brother and his wife are coming to visit. Her favorite flower is the daisy. Naturally, I chose the pink daisy for the bottom sheet, and the blue for the top sheet, with some basic white pillow cases. Cute. I'm considering making the gray fitted sheet into pillowcases... thoughts?
Some of my sheets have yet to find a match - the yellow flowers with blue centers are a recent addition to my collection (far left). The fabric is unevenly faded, though, and I'm considering this for a future sewing project. Maybe another apron? Or even cute pj bottoms?
The pink pillowcase is awaiting either a project or a pillow. I have yet to decide!
The white with floral embroidery is a heavy linen-like fabric. The embroidery was done by my great grandmother, Alice.
The white lace-edged pillowcases I found at a Salvation Army store - hooray for a pair! I use them regularly for their intended purpose.
I have three twin sized sheets and a few pillowcases in the pink and blue pansy print. I found these at different garage sales and thrift stores. These are my favorites, I think! They come with me as sleeping bag liners when I go on women's retreats with my mom.
The blue/green/white/aqua daisy print is a twin sheet that I found in my mom's collection. Very flower-power.
You can see the top corner of a set of two white-on-blue daisy print pillowcases that I found at Salvation Army. I also use these two as regular pillowcases - you can see them better in the bottom right corner of the first picture in this post.
The yellow and brown floral (very retro, I know!) is a complete full size set with two pillowcases (purchased at different times). Most of the set is very silky-smooth and faded from use, but the pillowcase on top is almost new and quite a bit stiffer. Still very smooth fabric.
And that embroidered pillowcase in the middle? Also the handiwork of my great grandmother, Alice. I never knew her, but I admire her patience and creativity. It's beautiful work. There are two of these, two, and they'll always be pillowcases in my house!

And that is one of my collections. Upcoming: scarves. What do you collect?

prototype: stand mixer cover version 1.0

I really would like a fancy-pants mixer, like the KitchenAid Artisan. That's not in the budget. If I had one, I would buy a pretty quilted cover for it, like this one. I have, in fact, created a wish list at Bed Bath & Beyond for that very item. And more. Someday.

However, I do like my vintage Sunbeam stand mixer. And if I cover it, maybe people will think I have a super-nice mixer. I know it doesn't matter. I just care anyway.

Here's version 1.0, made of a vintage sheet that also lives in my house as a bag and an apron.
First, I measured the length of my machine - about 14". It's 4" wide at the top, and 10" wide at the bowl. Side pieces ended up being about 13" tall by about 12" long. I need to add a little more ease for my final cover - probably an extra inch added to every measurement. I used 1/4" seams, and I think I'll stick with that.
I think I'll also add a second layer of fabric and some batting, and do some practice quilting before I put the pieces together. Just vertical lines. Nothing fancy.
For the top, I tapered the piece from 4" wide at the front to a point at the back. It seems to work well, but again, I need slightly more width. Will do that next time. And maybe I'll add some pretty piping.

But for now? My mixer is cute and covered. Win.

Saturday, August 6, 2011

pillowcase apron tutorial

A little while back, I ventured into the thrift store and found two pretty vintage pillowcases. I bought them to use the fabric in projects, but wasn't sure what I wanted to make out of them. I forged ahead with a pieced pillow cover out of a baby dress, and folded the pretty pillowcases for another day. Today, inspiration struck.

An apron!
Here's what you need:

  • One pillow case
  • Matching thread
  • an iron, set to the correct heat level for your pillow fabric
  • Basic sewing stuff (machine, scissors, pins)
*If you use my tutorial, please link back to me. I would love to see what you make! Feel free to make these for yourself or for gifts, but please don't sell aprons made from my tutorial. Thanks!

Begin by washing and ironing the pillow case. Fold it in half - bottom open edge meeting the top, sewn-shut edge. Iron a firm crease. Cut it apart on that line.

Take the bottom, open-edged half of the pillowcase (with the pretty, decorative edge) and cut open along the side seam.

Sew 1/4" from the top, cut edge with a large basting stitch - my stitch length was set to 4, the largest my machine allows. Sew another line of stitching below that one - this time 1/2" from the cut edge. You should now have two parallel lines of big stitches.

Grab just the top two (or bottom two) threads and pull gently. See it gathering?

Continue to gather along the length of the apron skirt, making sure that your gathers are evenly distributed across the skirt. Gather until the skirt width is about the same width as the un-cut pillowcase - about 20". Pretty!

One more thing - let's add some rolled hems to finish the sides. Press each side in 1/4", and then fold over a second time. Press. Sew close to the folded edge of the seam, all the way from top to bottom.

Set the skirt aside for a bit.

Making the waistband:

Using the upper half of what was once a pillowcase, measure in 4.5" across the length of the pillowcase. Cut it off - this is the middle of the waistband. Cut open along the side seam.

Measure again - another 4.5" across the width of the pillowcase, and cut it off. Cut it open on the side seam and on the opposite side - you have two equal pieces.

Pinning right sides together, join one short waistband piece to the middle waistband, and repeat on the other side.

Sew together with a 5/8" seam, and then press open.


Sew 1/4" from the edge, all the way around the waistband (all four sides!). Press in toward the wrong side of the fabric.
If you want to add extra stiffness, now is a good time. Cut a 1.5" wide, 20" long piece of lightweight fusible interfacing and attach it to the wrong side of the middle waistband only, following package directions. The interfacing should be placed close to the bottom or top of the waistband strip - not right in the middle. Otherwise, you'll have trouble folding it over. Make sense? I hope so! Set this aside for a bit.

Making pockets:

Using what little fabric is left of your pillowcase, cut a 5" x 7" piece from the corner. Cut this apart on the seam - two pockets.
Sew 1/4" from the edge, all the way around the pockets. Press in all the seams toward the wrong side of the fabric.
Now is the time to decide if you want to add trim to the pockets - a little ribbon or rick rack, perhaps? maybe some cute pom-poms? Find the trim and iron it on the correct setting.

Fold the top of the pocket over about 2" and press, creating a pocket that's about 5" deep.
Pin trim to the front of the pocket (if you're using trim) and sew on. Otherwise, sew close to the bottom of the folded over part (the 2" fold you made).
Repeat for the other pocket.

Add pockets to the skirt:

Measure in 9" from each side and mark the spot with a pencil or chalk line. Measure up 1" from the pretty pre-existing hem of your apron skirt and mark. Line up each pocket with the marks, and pin on.
Make sure that all the raw edges are pressed under, and then sew around the three closed sides of the pocket, staying close to the edge.

You'll have some long threads hanging - here's how to hide those.
Turn the skirt over to the wrong side, and pull gently on the thread that's showing at the top pocket corner. This will pull up a loop of thread from the other side. Tug on the loop until the other thread is on the wrong side. Tie a double knot, and cut off the ends of the thread. Repeat on each pocket corner.

Putting it all together:

Find the middle of the waistband and add a pin or a pencil mark to that spot. With the wrong side showing, find the middle of the top of the skirt, and do the same.
Place the waist band wrong-side-up on top of the skirt. To clarify, the wrong side of the skirt is touching the right side of the waist band right now. Line up the waistband stitches with the bottom set of gathering stitches on the skirt, matching the middles, and pin.
Now, "stitch in the ditch!" Translation: stitch directly on top of the already-existing stitches on the waistband, being sure to match those stitches with the bottom row of gathering stitches.
Fold this up and press. Turn over so that the right side of the skirt is showing.
Fold the waistband down over the gathering stitches, just hiding the bottom row of stitching. Pin on - I used a lot of pins! Take a trip to the ironing board, and iron the waistband in half along the entire length. Make sure that your edges line up!

If you'd like a little extra bit of pretty, do this to each end of the waistband/ties. Iron in half, and then open up again, wrong side showing. Fold down one side, making the top edge meet the middle - there's a triangle, just like the beginning of a paper airplane. Press, and repeat with the opposite side. Fold wrong sides together, and press again. Repeat on the other end. Pretty, yes?

Sew close to the bottom (currently open) edge of the waistband, right side up, all the way across the apron. Make sure that those bottom gathering stitches have been hidden! Sew one final line of stitching along the top of the waistband, tie off loose threads, clip, and try it on!
Yay! You made an apron! From a pillowcase!
Please let me know if anything was unclear. I'm happy to help!