I've been doing some small projects as I wait for our baby girl to be born! It's helpful to distract myself with something creative when I'm feeling so ready to greet this sweet little one.
For a long time now, I've wavered between giving away and keeping a certain pink wool zip-up hoodie I've had at least since my freshman year of college. It's cute, cozy, and the perfect fit...and I've worn the elbows to death. I darned them multiple times, and it just was not working anymore. I'm not really into elbow patches, so that option was out. So I kept the sweater. And tossed it between the "mend" and "give away" piles. Until a couple evenings ago.
Joshie and I came in from a very cold day in the snow last Monday, and I heated up my big rice pack for him to warm his hands and to keep him snuggled on the couch for a few minutes. It was hard for him to hold the large hot pack, but he was soon warm enough to be happy. That sparked my thoughts...maybe he needs his own hot pack!
I also recently saw that a friend (and relative) of mine made a small hot pack for her preemie's belly; it has helped his tummy troubles to subside and allowed him to sleep! Baby Center also recommends a warm pack like that for soothing colic in newborns, and I thought I should make one.
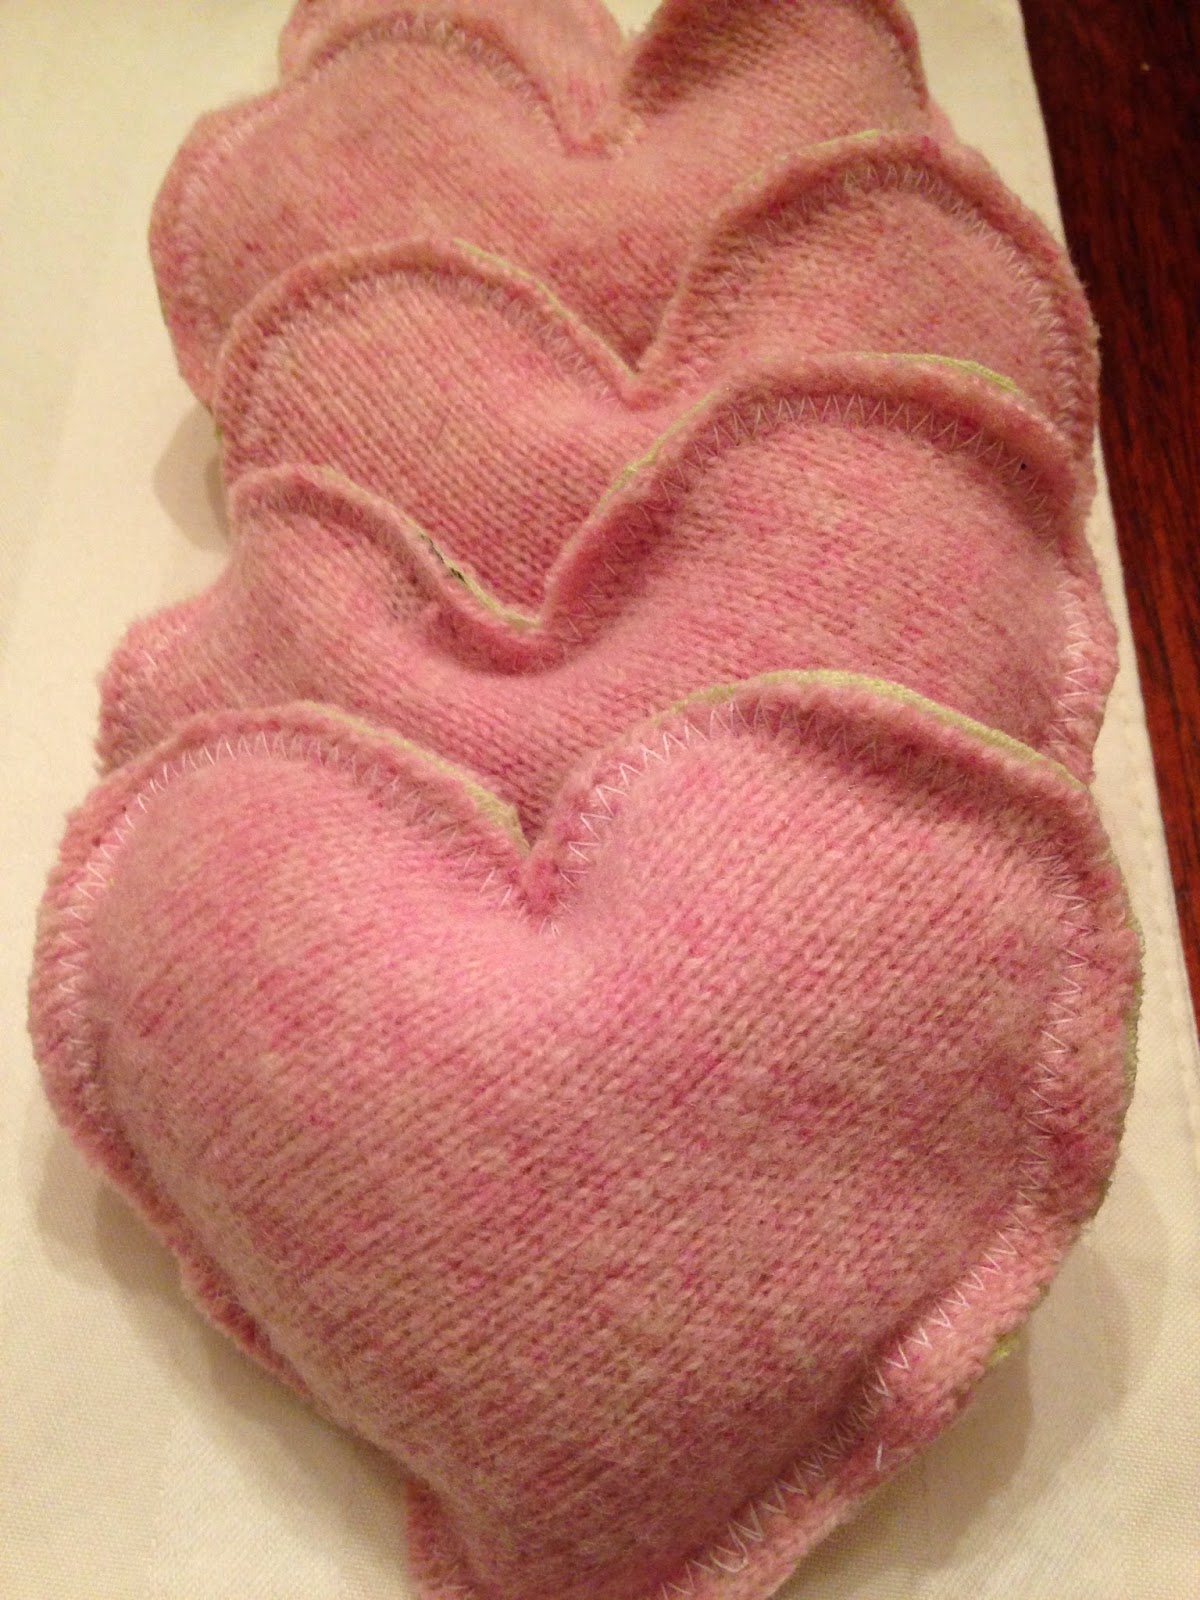
The final push to get this little project done came when I saw someone's adorable heart-shaped rice packs, and I had to give it a go! I honestly don't remember where I saw it, so if it was you, please know that you inspired me.
Would you like to make some, too? They're quick and easy, and you can make them in any shape you'd like!
You'll need:
Paper for creating a pattern
Dry rice (not quick rice)
Funnel
Spoon
Sewing machine
Scissors
Essential oil or dried lavender, if desired
A natural fiber fabric (cotton, wool, etc.)
Note: I used two fabrics, a wool sweater for the outside, and a 100% cotton tee shirt fabric (jersey) for the inside. You really only need one, but my wool sweater was worn very thin and needed some more structure.
Use your paper to create a simple shape for your pattern. I chose a heart shape, but it would be just as functional to cut a square, triangle, circle...or you could get fancy and do something else!
Cut two fabric pieces for each hot pack, and stack them with wrong sides (inside of fabric) together.
Using a zig-zag stitch, sew almost all the way around your fabric sandwich, leaving about 1" of the perimeter unsewn.
Using your funnel, spoon rice into your hot pack. My 4" hearts needed about 4T of rice each to feel full enough. You should have enough room to be able to shift the rice around a bit; don't stuff too firmly. At this point, you could also include dried lavender or a few drops of essential oil, if you'd like a scent other than warm rice.
Remove the funnel and sew up the opening of the hot pack. Be sure to start on top of the existing stitching so that there's less chance of the stitches unraveling.
Trim your edges close to the stitching so that they look neat.
Microwave for about 30 seconds on high and enjoy!
Showing posts with label DIY. Show all posts
Tuesday, January 13, 2015
Thursday, November 6, 2014
mini Captain America
This is probably the last Halloween that I can officially choose Joshie's costume without any input from him, so I made it a good one: Captain America!
The forecast for October looked chilly this year, and the trick-or-treating night proved cool and damp, indeed. I planned his costume to be cozy, using his snow boots and warm fleece pants. I put him in a thermal shirt and cozy socks, and used his navy blue fleece zip-up hoodie to complete the cozy. He absolutely loved holding "Daddy's" hand and running up to each door with his best buddy, JoJo. He quickly learned how to say "Trick-or-treat" and "Happy Halloween" and did a great job.
I ransacked our drawers for the right t-shirt material colors to make the stripey portions and the essential Captain America shield. Luckily, one of Brad's old undershirts, one of my red tank tops, and a royal blue onesie from the too-small, too-old-to-wear pile were just the right colors to use for the project.
I made a "pinny" of sorts out of the undershirt, first, so that I could pull it on over Joshie's coat. I then used strips of red to make the stripes, sewing right onto the pinny.
The star was made of more undershirt material, but I first attached interfacing to make it stiffer. I then sewed around the shape of the star, cut it out, and cut it in half. I attached it to either side of the zipper on the fleece hoodie, using large stitches to make it easy to remove later. The letter "A" on the hood was made using the same process.
For the shield, I used a frisbee and traced a circle onto the red tank top fabric that was about 3" larger all around. I then made a channel to thread elastic through, and set that circle aside. I added two white circles and a blue one, with a final star in the center to complete the look. I threaded the elastic through the red fabric and stretched it over the frisbee. Hooray, a shield! I added two pieces of elastic to the back of the shield so that Joshie could wear it on his arm or his back.
Here's the whole look:
"app-eee ah-ween!" "tick uh teet!!" says Joshua. :)
The forecast for October looked chilly this year, and the trick-or-treating night proved cool and damp, indeed. I planned his costume to be cozy, using his snow boots and warm fleece pants. I put him in a thermal shirt and cozy socks, and used his navy blue fleece zip-up hoodie to complete the cozy. He absolutely loved holding "Daddy's" hand and running up to each door with his best buddy, JoJo. He quickly learned how to say "Trick-or-treat" and "Happy Halloween" and did a great job.
I ransacked our drawers for the right t-shirt material colors to make the stripey portions and the essential Captain America shield. Luckily, one of Brad's old undershirts, one of my red tank tops, and a royal blue onesie from the too-small, too-old-to-wear pile were just the right colors to use for the project.
I made a "pinny" of sorts out of the undershirt, first, so that I could pull it on over Joshie's coat. I then used strips of red to make the stripes, sewing right onto the pinny.
The star was made of more undershirt material, but I first attached interfacing to make it stiffer. I then sewed around the shape of the star, cut it out, and cut it in half. I attached it to either side of the zipper on the fleece hoodie, using large stitches to make it easy to remove later. The letter "A" on the hood was made using the same process.
For the shield, I used a frisbee and traced a circle onto the red tank top fabric that was about 3" larger all around. I then made a channel to thread elastic through, and set that circle aside. I added two white circles and a blue one, with a final star in the center to complete the look. I threaded the elastic through the red fabric and stretched it over the frisbee. Hooray, a shield! I added two pieces of elastic to the back of the shield so that Joshie could wear it on his arm or his back.
Here's the whole look:
The red snow plow is an essential part of getting out the door. We always bring a tractor, truck, or ball when we go out! |
"app-eee ah-ween!" "tick uh teet!!" says Joshua. :)
Friday, May 2, 2014
short sleeves for spring
My mother-in-law loves to dote on her grandson. This makes me a happy momma, indeed!
Last week, we stopped in at a local children's resale shop, and she picked up a haul of great deals for Joshua to enjoy this spring and summer! A couple pairs of shorts, a Fisher Price bubble mower, and their everyday 10 onesies for $10 deal.
Four of the onesies happened to be long sleeved, and that's not so suitable for spring, right? But I had an idea...
...and I made them into short sleeved onesies!
You may remember that I wrote a silly little lament for my sewing machine. The machine is still out of commission, but a good friend of mine let me borrow her (new in the box!) machine for my little project. So generous! It was a dream to sew on such an easy-to-use, smooth machine. Everything went so perfectly. Thank you, Dena!
I cut off the sleeve at the length I wanted the finished sleeve to be. I used an existing short sleeved shirt of Joshua's to be sure it was a good length.
Then, I cut off the original shirt sleeve cuffs, turned them inside out, and fitted them over the newly-shortened sleeve so that the raw edges lined up.
Lastly, I stretched the fabric out and sewed straight-line stitches to reattach the "new" sleeve cuffs. Turned them back to the right side, trimmed threads, and there we go!
Cute? I think so! I'm pleased and happy to have some "new" play clothes for my little boy! Thanks, "Grandma!"
Tuesday, April 8, 2014
play dough, for real
Yesterday, I felt like super mom. Made dinner in the crock pot, swept floors, played with baby, made homemade play dough. Today? Let's just roll with it and let it be what it is!
I used this recipe for play dough, and found it to be good. I didn't have quite enough cream of tartar, but it still turned out well! Smooth, soft, squishy, and almost exactly like the brand name stuff. It does have a bit of a salty, grainy texture, but that didn't bother me. Also, if it gets wet, the food coloring starts to bleed onto hands. But I can live with that! It also made A LOT of play dough - I split it into fourths and put away 3/4 of the dough in separate containers for another day.
Joshua loved it!
Monday, August 20, 2012
sewing for Baby
You already know that I like to reuse and repurpose fabric - often a thrifted vintage sheet or pillow case, and sometimes, cast-off clothing.
This weekend, I pulled out a much-loved and much-worn (and too small in the neck) short-sleeved dress shirt that belonged to the resident daddy-to-be, and turned it into a play suit for our little boy!
First, I traced a 6-month sized outfit from our slowly growing stash of clothing for the little guy:
Then, I cut the dress shirt open at the seams, across the back yoke, and around the collar. I cut off the sleeves and set them aside for a future little project. I ironed the easy-care no-iron fabric, which just made life a little easier. I first cut from what was once the back of the shirt, moving the pattern to one side so that I could save as much fabric as possible. The great thing I discovered about this woven dress shirt fabric is that it's the same on the right side and the wrong side. Sweet. I then used the opened up back piece, centering it on the front button placket, pinned, and cut out the front piece.
First, I determined how many buttons I wanted to actually be able to use. Three seemed sufficient, so I sewed over the existing seams to close the button placket at the bottom.
It almost looks like a zipper fly. I then finished the leg openings with an easy rolled hem (sew 1/4" from the edge, press toward the wrong side, fold up and press again toward the wrong side, and then sew 1/4" seam to finish).
Next, I sewed the front and back pieces together - just up the sides and across the shoulders, avoiding arm and leg holes - with the wrong sides together, using a scant 1/4" seam. I then turned the outfit inside out and carefully pressed the seams.
Working on the wrong side of the fabric, I sewed the same sides and shoulders again, just a little bit bigger than 1/4" from the finished seam. This enclosed the raw edges of the fabric so that nothing will be itchy on Baby's soft skin. Then I pressed the seams toward the front side and sewed them down, again just a scant 1/4" from the finished edge. This is called a French seam, by the way. You'll see this kind of seam in really nice dress shirts - check the side seams! Here is a good tutorial, if you'd like to try this kind of seam on your next project.
Next, I had to re-trim the armhole openings because of my zeal in seaming the sides. Alas.
Then, I used this tutorial to make bias tape out of the remaining shirt pieces. I then trimmed the neck, armholes, and crotch opening with my snazzy matching bias tape.

What do you think? Little guy wearing Daddy's clothes - I love it!
I'm linking up at Sew Much Ado's "We Did It! Wednesday." Go check out what other people have made, too!

This weekend, I pulled out a much-loved and much-worn (and too small in the neck) short-sleeved dress shirt that belonged to the resident daddy-to-be, and turned it into a play suit for our little boy!
First, I traced a 6-month sized outfit from our slowly growing stash of clothing for the little guy:
Isn't this a cute little outfit? It will be perfect for Memorial Day! |
I then measured sides, arm holes, and leg openings and used a ruler to square up my lines. I traced a coaster to get the right curve for the neck, since the neckline on the red outfit was different than what I was wanting for this one, and then measured a 1/2" seam allowance around the entire pattern. I folded the pattern in half so that I could cut it out on the fold instead of taking a chance and having mismatched sides.
Then, I cut the dress shirt open at the seams, across the back yoke, and around the collar. I cut off the sleeves and set them aside for a future little project. I ironed the easy-care no-iron fabric, which just made life a little easier. I first cut from what was once the back of the shirt, moving the pattern to one side so that I could save as much fabric as possible. The great thing I discovered about this woven dress shirt fabric is that it's the same on the right side and the wrong side. Sweet. I then used the opened up back piece, centering it on the front button placket, pinned, and cut out the front piece.
First, I determined how many buttons I wanted to actually be able to use. Three seemed sufficient, so I sewed over the existing seams to close the button placket at the bottom.
It almost looks like a zipper fly. I then finished the leg openings with an easy rolled hem (sew 1/4" from the edge, press toward the wrong side, fold up and press again toward the wrong side, and then sew 1/4" seam to finish).
There's the little "fly" for the little guy's outfit! |
Working on the wrong side of the fabric, I sewed the same sides and shoulders again, just a little bit bigger than 1/4" from the finished seam. This enclosed the raw edges of the fabric so that nothing will be itchy on Baby's soft skin. Then I pressed the seams toward the front side and sewed them down, again just a scant 1/4" from the finished edge. This is called a French seam, by the way. You'll see this kind of seam in really nice dress shirts - check the side seams! Here is a good tutorial, if you'd like to try this kind of seam on your next project.
Here's the inside of the French seam. Click on the picture to see it better! |
Then, I used this tutorial to make bias tape out of the remaining shirt pieces. I then trimmed the neck, armholes, and crotch opening with my snazzy matching bias tape.
Sigh. Then I had to wait, because I didn't yet have snaps. But yesterday, I picked some up! Hubby was impressed with my use of a hammer as I fastened the little snaps to the outfit. I love that he's proud of what I do.
And now it's done!!What do you think? Little guy wearing Daddy's clothes - I love it!
I'm linking up at Sew Much Ado's "We Did It! Wednesday." Go check out what other people have made, too!

Friday, August 19, 2011
lament for a sewing machine c. 1980-2011
heavy steel, delicate thread
well-oiled parts, clean and sharp
just enough give and take
quiet years, dusty case
easily replaced, old and dull
almost forgotten
opened box, new notions
new-found friend, light and use
a chance to assist and create
one, two, three, more
inspired projects, peace and delight
a passion and pastime
halted work, crunched grip
knotted thread, tight and pulled
too much to take
patient hands, labored, slow
restored function, not quite right
back in the box
--------------
All that to say, I'm really frustrated that my sewing machine is not working properly. I can't do any projects until it's fixed or until I have a new one. Just in time for school to start, right? I guess that can't distract me anymore. Studies, here I come. Sad face.
Update 9/25/11: The sewing machine has made its way to the shop. Hoping that it doesn't cost a whole lot, and that it works again soon! In the meantime, I have my MIL's old workhorse of a sewing machine in case I want to sew...correction, if I have time to sew!
Labels:
craft,
DIY,
home decorating,
sewing
Saturday, August 13, 2011
prototype: stand mixer cover version 1.0
I really would like a fancy-pants mixer, like the KitchenAid Artisan. That's not in the budget. If I had one, I would buy a pretty quilted cover for it, like this one. I have, in fact, created a wish list at Bed Bath & Beyond for that very item. And more. Someday.
However, I do like my vintage Sunbeam stand mixer. And if I cover it, maybe people will think I have a super-nice mixer. I know it doesn't matter. I just care anyway.
Here's version 1.0, made of a vintage sheet that also lives in my house as a bag and an apron.
First, I measured the length of my machine - about 14". It's 4" wide at the top, and 10" wide at the bowl. Side pieces ended up being about 13" tall by about 12" long. I need to add a little more ease for my final cover - probably an extra inch added to every measurement. I used 1/4" seams, and I think I'll stick with that.
I think I'll also add a second layer of fabric and some batting, and do some practice quilting before I put the pieces together. Just vertical lines. Nothing fancy.
For the top, I tapered the piece from 4" wide at the front to a point at the back. It seems to work well, but again, I need slightly more width. Will do that next time. And maybe I'll add some pretty piping.
But for now? My mixer is cute and covered. Win.
However, I do like my vintage Sunbeam stand mixer. And if I cover it, maybe people will think I have a super-nice mixer. I know it doesn't matter. I just care anyway.
Here's version 1.0, made of a vintage sheet that also lives in my house as a bag and an apron.
For the top, I tapered the piece from 4" wide at the front to a point at the back. It seems to work well, but again, I need slightly more width. Will do that next time. And maybe I'll add some pretty piping.
But for now? My mixer is cute and covered. Win.
Subscribe to:
Posts (Atom)