Oh, yes.
If you know me, you know that for dessert to be dessert, it must have one key ingredient:
CHOCOLATE.
Pie is great. I like cake, for sure. Cookies are delicious. But if given a choice (unless it's Grandma Landin's pie with sugar on top), I will choose the one with chocolate. Every time. Except for when it's Grandma's pie.
That said, these peanut butter cookies have just been elevated from breakfasty-kind-of-cookie to Dessert-Cookie.
The hubby loves oatmeal cookies.
The son loves peanut butter.
I love chocolate.
These cookies are a win.
And? I didn't even tweak the recipe. Not one bit. And I let Joshie stand next to me on chair the whole time and "help" me. The recipe was that easy. It was our rainy day activity. The blah-day remedy. The "fill up a half hour so my son doesn't fall apart because of teething pain" diversion.
What recipe, you ask?
This one. Half brown sugar, half granulated. Butter. Peanut butter. (or "buttah-buttah," as my son calls it) Vanilla. Flour. Baking soda. Salt. Quick oats. CHOCOLATE CHIPS.
I love when a recipe has all simple, everyday ingredients but turns out so deliciously. Mmmm. Nobody ruin my bliss by telling me about empty calories, processed sugar, blah blah blah. I'll go running tomorrow. No, for real. I will. After I eat another cookie.
Go make these! Now. Go.
Showing posts with label homemaking. Show all posts
Showing posts with label homemaking. Show all posts
Wednesday, April 30, 2014
Monday, July 23, 2012
oatmeal cookies
Get to know my hubby a little bit, and you'll find out that the guy loves anything oatmeal or bran. Muffins, cookies, breads, cereal - it's a win in his book!
Last winter, he was asking me to make oatmeal cookies, and I diligently searched for a recipe. I had been getting a subscription to Disney's Family Fun magazine - one of those freebies that I didn't sign up for - and the next issue (March 2012) had a recipe for "A Better Oatmeal Cookie." The recipe is by Bill Collins, a personal chef in Massachusetts, whose blog is here. He looks pretty cool, and that's not just because he's a chai tea drinker. (He even has a recipe for chai!) Unlike other oatmeal cookie recipes, this one has such tiny amounts of sugar and fat - it's mostly oatmeal and raisins. I was skeptical, but tried it anyway. Of course, you know that I can't follow a recipe to a "t."
The first time around, I made these with dried cranberries and dried cherries - yum! They come out like granola cookies, not quite so much like a flat, chewy oatmeal cookie. They're delicious, and gone in no time when hubby's home. And, in my opinion, they almost count as a breakfast food or snack.
This time, I had no butter in the house (WHAT?!), so I substituted vegetable oil for the melted butter in the recipe. It might just be the different oven I used, but they came out more moist than last time! Firm on the outside, and soft and chewy on the inside.
Another blogger has posted the recipe, but didn't care for it as we do! You have to realize that this is not ye-old-traditional-oatmeal-cookie. Here is the recipe, with my diversions (haha!) beside:

1/2 cup raisins (or dried cherries, dried cranberries, chocolate chips)
1/2 cup sifted flour (I used whole wheat)
1/2 cup sugar
1/2 teaspoon salt
1 teaspoon baking powder
1 teaspoon cinnamon (heaping)
1/4 teaspoon nutmeg (oh, darn. that's what I forgot to buy more of at the grocery today.)
1 egg (I used an XL egg this time)
1 teaspoon vanilla extract (I guessed, using the lid of the vanilla bottle for a measuring spoon)
1/4 cup butter, melted (or vegetable oil)
3 cups quick oats
Heat the oven to 350 degrees F. Line two cookie sheets with parchment paper. Place the raisins in a small bowl and cover with water, allowing them to soak for 15 minutes.
In a large bowl, sift together the flour, sugar, salt, baking powder, cinnamon, and nutmeg. Stir to blend evenly.
Set aside three tablespoons of the water from the bowl of raisins, then drain the raisins, discarding the remaining water.
Whisk the egg in a medium bowl. Stir in the vanilla extract, melted butter, and reserved raisin water. (If you're using vegetable oil, measure that in a liquid measuring cup first, then beat the egg right into measuring cup with the oil. I used a fork to "whisk." Add vanilla and water to these nicely whisked liquids.)
Make a well in the flour mixture, then pour in the egg mixture and blend well. Add the oats and raisins. The dough will be lumpy.
With a tablespoon or 1 1/2 tablespoon cookie scoop, place portions of the dough on the cookie sheets, flattening the tops slightly. (I used my hands to portion out dough, squeezed it into a suitably cookie-like shape, and then placed on the parchment. Messier, but effective. And fun.)
Bake the cookies one pan at a time (um, I did both at the same time on two different racks), rotating the pan halfway through (I switched and rotated the pans), until they're golden brown (just barely, at the edges!), for about 16 minutes (14 minutes in my older gas oven without an electronic timer). Allow to cook on the cookie sheet for 3-4 minutes (or not), then use a spatula to transfer to a wire rack for complete cooling.
Eat them all.
I think these would be pretty amazing with, say, slivered almonds mixed in - perhaps 1/4 c. Maybe I'll try that next time. Or - what if I used peanut butter to sub for the butter? Ooh... or Nutella? And what if I added cardamom, and subbed in golden raisins? I think I'll experiment again, soon!
 |
| Why only one cookie in the picture? Because the rest are tightly sealed in a plastic zip-top bag. If I take out more than one, more than one will disappear, if you know what I mean! |
Thursday, February 9, 2012
A happy story
When a bridal shower was thrown for me at the church where I grew up, my dear hubby was blissfully unaware that men don't usually attend bridal showers. Admittedly, I didn't tell him, because I wanted him there! We both had a great time, and it was clear to everyone that we certainly belong together - we bring out the best in each other, as you can see below!
 Here we are, modeling our new "hats" - err - nesting mixing bowls. This great set of three mixing bowls is by Architec, whose slogan is "live smart." Live smart, indeed. I love the design of these mixing bowls. Here's why:
So, you can imagine my disappointment when I was washing my yellow bowl and the rubber grippy on the bottom just fell out! Sad day.
Here's where Architec gets my vote: their customer service rocks. I called their 800 number, which is listed on their website. I reached a recording, as expected, and customer service was the second option. I expected to be waiting for minutes with nasty hold music, but instead, I heard a dial tone and someone picked up immediately. She was clearly a native English speaker, and introduced herself right away. She listened carefully to me as I told her how much I like these mixing bowls and how disappointed I was that the yellow one had fallen apart. I asked what she might be able to do for me, fully expecting that she'd offer me some sort of coupon or apology. Instead, I was briefly put on hold, for maybe a minute, total, and she was back, offering to send me a replacement... for free! Wow!
Oh! And there wasn't any hold music at all...such a treat for this music student.
So, now I'm awaiting my replacement bowl, with a smile on my face and a mission to seek out more Architec products for my kitchen. You should, too!

- They come in great, bright colors! Mine are yellow (small), lime green (medium), and aqua-blue (large).
- The sizes are generous. The "small" one is actually big enough for a cake mix or 13"x9" brownie mix.
- They're taller than they are wide, making them great for stirring something splashy like a thin pancake batter. They are also round at the bottom, and oblong at the top - a really neat, unusual design.
- They have a grippy rubber bottom, so you can effectively stir one-handed if needed - thinking ahead to the one-day necessary child-on-my-hip-while-making-dinner thing.
- Genius addition? A pour spout. But what makes these unique is that the opposite side is slightly higher, making a great spot to grip as you pour!
- A bonus for me and my tiny hands and wrists: these are sturdy, thick plastic, but they're not too heavy to pour, even when they're full. Love.
So, you can imagine my disappointment when I was washing my yellow bowl and the rubber grippy on the bottom just fell out! Sad day.
Here's where Architec gets my vote: their customer service rocks. I called their 800 number, which is listed on their website. I reached a recording, as expected, and customer service was the second option. I expected to be waiting for minutes with nasty hold music, but instead, I heard a dial tone and someone picked up immediately. She was clearly a native English speaker, and introduced herself right away. She listened carefully to me as I told her how much I like these mixing bowls and how disappointed I was that the yellow one had fallen apart. I asked what she might be able to do for me, fully expecting that she'd offer me some sort of coupon or apology. Instead, I was briefly put on hold, for maybe a minute, total, and she was back, offering to send me a replacement... for free! Wow!
Oh! And there wasn't any hold music at all...such a treat for this music student.
So, now I'm awaiting my replacement bowl, with a smile on my face and a mission to seek out more Architec products for my kitchen. You should, too!
Thursday, February 2, 2012
Chocolate Chip Cranberry Cookies
The new recipe book from Grandma is seeing some more use!
I tried the recipe for "Hershey's Double Chocolate Mini Kisses Cookies." You know me: I just can't stick exactly to the recipe!
Here's the recipe, with my alterations:
Preheat the oven to 350 degrees F.
1 c. softened butter
1 1/2 cups sugar
2 eggs
2 tsp vanilla extract
Cream these ingredients together until light and fluffy. Meanwhile, mix the following dry ingredients together in a separate bowl:
2 c. flour
2/3 c. Hershey's Cocoa - I used special dark, of course
3/4 tsp baking soda
1/4 tsp salt
Add gradually to the creamed mixture. The dough will be rather stiff. At this point, my poor vintage Sunbeam Mixmaster was mastered by the stiff dough and gave up, so I had to mix by hand. I'm calling it my lower arm workout for the day!
Next, fold in the chocolate chips and cranberries:
1 1/3 c. semisweet chocolate chips
1/3 c. dried cranberries (Craisins)
The recipe says to add Hershey's mini kisses rather than the chocolate chips, and also requires chopped nuts. I improvised with the chocolate chips and Craisins - excellent.
Next, the recipe said to drop by rounded spoonful onto the cookie sheet. I tried that, and just didn't like how it looked. The dough was stiff enough, so I rolled the dough into 3/4" balls.
Bake for 8-10 minutes, or until edges are set. Cool for 1 minute on the baking sheet before removing to a wire rack to cool. They say it makes 3 1/2 dozen, but making it my way gave me 6 dozen.
They're a delicious, truly chocolate cookie. The cranberries are just the right addition of tartness, and I love the way the melted chocolate chips add to the cookie. Happy!

I tried the recipe for "Hershey's Double Chocolate Mini Kisses Cookies." You know me: I just can't stick exactly to the recipe!
 |
| Displayed on one of my new floral accent plates from my mother-in-law! |
Preheat the oven to 350 degrees F.
1 c. softened butter
1 1/2 cups sugar
2 eggs
2 tsp vanilla extract
Cream these ingredients together until light and fluffy. Meanwhile, mix the following dry ingredients together in a separate bowl:
2 c. flour
2/3 c. Hershey's Cocoa - I used special dark, of course
3/4 tsp baking soda
1/4 tsp salt
Add gradually to the creamed mixture. The dough will be rather stiff. At this point, my poor vintage Sunbeam Mixmaster was mastered by the stiff dough and gave up, so I had to mix by hand. I'm calling it my lower arm workout for the day!
Next, fold in the chocolate chips and cranberries:
1 1/3 c. semisweet chocolate chips
1/3 c. dried cranberries (Craisins)
The recipe says to add Hershey's mini kisses rather than the chocolate chips, and also requires chopped nuts. I improvised with the chocolate chips and Craisins - excellent.
Next, the recipe said to drop by rounded spoonful onto the cookie sheet. I tried that, and just didn't like how it looked. The dough was stiff enough, so I rolled the dough into 3/4" balls.
 |
| See the cranberry in that one? Mmm! |
They're a delicious, truly chocolate cookie. The cranberries are just the right addition of tartness, and I love the way the melted chocolate chips add to the cookie. Happy!

Friday, January 13, 2012
Darn. Or, On Fixing Things.
Use it up,
Wear it out,
Make it do,
Or do without.
Good advice, yes? Being on a budget that's less than what I was accustomed to is an adjustment. I'm sure you know how this feels. While we're in this place, and really, throughout our lives, it just makes sense to practice things like Using All the Leftovers, Not Buying Ridiculous Numbers of Sweaters, Dealing With Imperfect Furniture, and Living Without "Essentials" Like T.V. You're probably also couponing, meal planning, freezing, canning, green-cleaning, and creatively stretching your funds in ways I haven't thought of! Do share, by the way!
This is one reason I enjoy looking to the past, embracing my vintage Pyrex collection, appreciating the excellent craftsmanship of vintage fabrics, and picking up other various useful household items that once had a life somewhere else, in another Time. They're often better made, have ingenious uses, and are just plain lovely.
In that same spirit, I want to share with you today How to Darn.
Yes, that's a legitimate use of the word. Darn! It's a verb.
When our great-grandmothers spent long hours knitting socks, sweaters, and other clothing items, throwing away wasn't an option. Instead of getting rid of a sock or sweater or hat or whatever that had a hole, they would fix it and keep using it, not unlike how we patch a pair of beloved jeans. This technique also works on jeans and woven fabrics. Just be sure to have a heavy needle and thread ready!
I have a pair of light lavender/pink cashmere gloves, and the thumbs have worn really thin, to the point of creating holes. I also have a beautiful pair of gray wool cabled mittens from my Grandma, which are so loved that their thumbs have holes, too. Sad day:

1. Find a long length of a similar color thread or thin yarn, and thread a needle.
2. Observe the pattern of the fabric. See the little V's all stacked on each other like a chevron pattern? Excellent. In between each half of a V is a horizontal thread. If you stretch the fabric, you'll be able to see these horizontal threads making a ladder-like pattern.
3. Starting about 2" away from the hole, begin to weave your thread over-under-over-under the horizontal ladder threads, hiding it between the halves of the V's. Like this:

If you're working with something small, like a glove or sock, it's helpful to put something inside - your hand in the glove, or an old incandescent light bulb in the sock - to be sure you're not picking up fabric on the opposite side of the garment. Women of old actually had a wooden darning tool shaped much like a light bulb...
4. As you approach the hole or weak area in the fabric, draw the thread straight across to the other side of the hole, being careful not to pull it too tightly. You want the fabric to continue to lie flat, without rippling it.
5. Change directions, working so that you have many vertical lines of thread crossing the weak area or hole. Like this:

6. Now, begin to work horizontally, weaving the thread over-under-over-under the new threads you've added and the existing threads (if there are any). Like this:
 Continue working until the entire hole is covered, or until the weak area is strengthened.
7. Halfway there!
 8. Rather than tying a knot in the thread (which can add unnecessary bulk to the fabric), find another column of V's and weave it in and out of the horizontal ladder threads for about 2". Cut the tail of the thread close to the work, being Very Careful not to cut the fabric.
Done darning, darling!
9. Admire your work and continue to use your favorite gloves, hat, mittens, scarf, sweater, whatever - in the knowledge that you not only saved some money, but that you have a connection to your history, and to people of all times.
 On the gray mittens, I used yarn on one thumb, and thread on the other. Both blend in well - you decide what you like best for each project!
 On the lavender pink gloves, you'll notice that the left thumb is puckering a little. This is not because it's extra flirty, but because I pulled the threads too tight: a word of caution. It still fits just fine, but isn't perfect. Just like me. :o)
 Well, what are you waiting for? Go fix your favorite knits!
Wear it out,
Make it do,
Or do without.
Good advice, yes? Being on a budget that's less than what I was accustomed to is an adjustment. I'm sure you know how this feels. While we're in this place, and really, throughout our lives, it just makes sense to practice things like Using All the Leftovers, Not Buying Ridiculous Numbers of Sweaters, Dealing With Imperfect Furniture, and Living Without "Essentials" Like T.V. You're probably also couponing, meal planning, freezing, canning, green-cleaning, and creatively stretching your funds in ways I haven't thought of! Do share, by the way!
This is one reason I enjoy looking to the past, embracing my vintage Pyrex collection, appreciating the excellent craftsmanship of vintage fabrics, and picking up other various useful household items that once had a life somewhere else, in another Time. They're often better made, have ingenious uses, and are just plain lovely.
In that same spirit, I want to share with you today How to Darn.
Yes, that's a legitimate use of the word. Darn! It's a verb.
When our great-grandmothers spent long hours knitting socks, sweaters, and other clothing items, throwing away wasn't an option. Instead of getting rid of a sock or sweater or hat or whatever that had a hole, they would fix it and keep using it, not unlike how we patch a pair of beloved jeans. This technique also works on jeans and woven fabrics. Just be sure to have a heavy needle and thread ready!
I have a pair of light lavender/pink cashmere gloves, and the thumbs have worn really thin, to the point of creating holes. I also have a beautiful pair of gray wool cabled mittens from my Grandma, which are so loved that their thumbs have holes, too. Sad day:

Here's how I fixed them, and how you can fix (almost) any other holey knit item.
1. Find a long length of a similar color thread or thin yarn, and thread a needle.
2. Observe the pattern of the fabric. See the little V's all stacked on each other like a chevron pattern? Excellent. In between each half of a V is a horizontal thread. If you stretch the fabric, you'll be able to see these horizontal threads making a ladder-like pattern.
3. Starting about 2" away from the hole, begin to weave your thread over-under-over-under the horizontal ladder threads, hiding it between the halves of the V's. Like this:

If you're working with something small, like a glove or sock, it's helpful to put something inside - your hand in the glove, or an old incandescent light bulb in the sock - to be sure you're not picking up fabric on the opposite side of the garment. Women of old actually had a wooden darning tool shaped much like a light bulb...
4. As you approach the hole or weak area in the fabric, draw the thread straight across to the other side of the hole, being careful not to pull it too tightly. You want the fabric to continue to lie flat, without rippling it.
5. Change directions, working so that you have many vertical lines of thread crossing the weak area or hole. Like this:

6. Now, begin to work horizontally, weaving the thread over-under-over-under the new threads you've added and the existing threads (if there are any). Like this:

7. Halfway there!

Done darning, darling!
9. Admire your work and continue to use your favorite gloves, hat, mittens, scarf, sweater, whatever - in the knowledge that you not only saved some money, but that you have a connection to your history, and to people of all times.


Wednesday, January 11, 2012
cocoa crinkle cookies
I can hardly contain the chocolaty deliciousness! My Grandma and Grandpa gave me a Hershey's chocolate cookbook for Christmas, and I've flagged some recipes to try. First on the list: Rich Cocoa Crinkle Cookies. Observe:
 Oooh, ahhhh....
I am pretty sure this is a new go-to cookie. It might rank justabove below chocolate chip cookies (mmmm!!!). At any rate, it's a new personal favorite!

Here's the recipe from my new cookbook:
2 cups granulated sugar
3/4 cup vegetable oil
1 cup Hershey's Cocoa (I used Special Dark)
4 eggs
2 teaspoons vanilla extract
2 1/3 cups all purpose flour
2 teaspoons baking powder
1/2 teaspoon salt
Powdered sugar
1. Combine granulated sugar and oil in large bowl; add cocoa, beating until well blended. Beat in eggs and vanilla. Stir together flour, baking powder, and salt. Gradually add to cocoa mixture, beating well.
2. Cover; refrigerate until dough is firm enough to handle; at least 6 hours.
3. Heat oven to 350 degrees F. Lightly grease cookie sheet or line with parchment paper. Shape dough into 1-inch balls (commentary: 1 inch is decidedly too large, in my book. However....); roll in powdered sugar to coat. Place about 2 inches apart on prepared cookie sheet.
4. Bake 10 to 12 minutes or until almost no indentation remains when touched lightly and tops are crackled. Cool slightly (2 minutes, here). Remove from cookie sheet to wire rack. Cool completely.
The recipe says it makes about 6 dozen, but I only came up with about 5.5 dozen, and with making the cookies smaller than suggested. I promise I only ateone two. So far, that is.
And how do they taste? A little like brownies! Slightly gooey, crunchy around the edges, so richly chocolate. A total success.
Thank you, Grandma and Grandpa!

I am pretty sure this is a new go-to cookie. It might rank just

Here's the recipe from my new cookbook:
2 cups granulated sugar
3/4 cup vegetable oil
1 cup Hershey's Cocoa (I used Special Dark)
4 eggs
2 teaspoons vanilla extract
2 1/3 cups all purpose flour
2 teaspoons baking powder
1/2 teaspoon salt
Powdered sugar
1. Combine granulated sugar and oil in large bowl; add cocoa, beating until well blended. Beat in eggs and vanilla. Stir together flour, baking powder, and salt. Gradually add to cocoa mixture, beating well.
2. Cover; refrigerate until dough is firm enough to handle; at least 6 hours.
3. Heat oven to 350 degrees F. Lightly grease cookie sheet or line with parchment paper. Shape dough into 1-inch balls (commentary: 1 inch is decidedly too large, in my book. However....); roll in powdered sugar to coat. Place about 2 inches apart on prepared cookie sheet.
4. Bake 10 to 12 minutes or until almost no indentation remains when touched lightly and tops are crackled. Cool slightly (2 minutes, here). Remove from cookie sheet to wire rack. Cool completely.
The recipe says it makes about 6 dozen, but I only came up with about 5.5 dozen, and with making the cookies smaller than suggested. I promise I only ate
And how do they taste? A little like brownies! Slightly gooey, crunchy around the edges, so richly chocolate. A total success.
Thank you, Grandma and Grandpa!
Saturday, August 13, 2011
vintage sheet collection
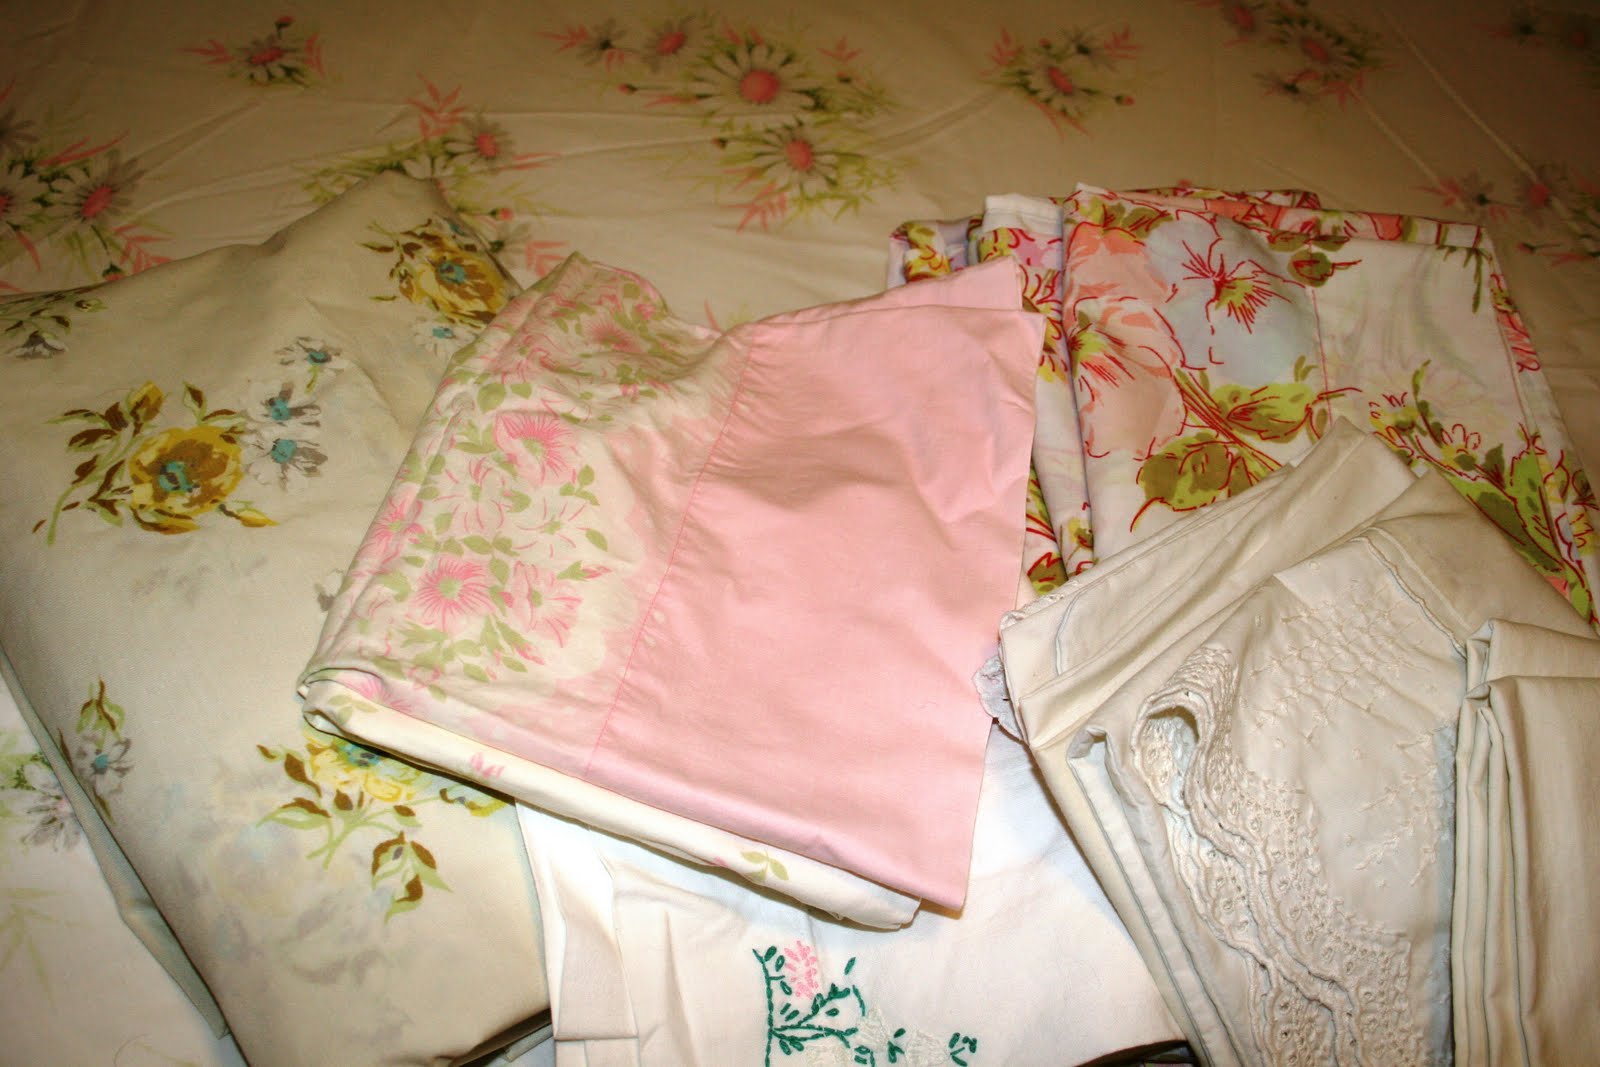
I have a few collections. We've already discussed my extensive sweater collection, and the beginnings of a Pyrex collection. On display today: my vintage sheet collection.
 Why vintage sheets? The older sheets are often 100% cotton percale, very smooth fabric, softer than my 500 thread count brand-new sheets. The designs are pretty. They're not sateen, so they don't pill. The fabric is useful for things other than sheets. And they're inexpensive, especially when found at thrift stores! The only downside? Most sheets are sized for a double bed. This does not deter me from purchasing them, though! Besides, we own a full size air mattress. A flat double sheet can be tucked onto a queen size mattress (just barely), and a second flat sheet on top works just fine. It does mean that there's a little less sheet to go around, though.
  Most of my sheets have been purchased separately from each other. I have three distinct color patterns of this daisy print sheet (all double size) - two pink flat (one faded pink), one blue flat, and one gray fitted sheet. These are gracing the guest room bed right now, since my brother and his wife are coming to visit. Her favorite flower is the daisy. Naturally, I chose the pink daisy for the bottom sheet, and the blue for the top sheet, with some basic white pillow cases. Cute. I'm considering making the gray fitted sheet into pillowcases... thoughts?
 Some of my sheets have yet to find a match - the yellow flowers with blue centers are a recent addition to my collection (far left). The fabric is unevenly faded, though, and I'm considering this for a future sewing project. Maybe another apron? Or even cute pj bottoms?
The pink pillowcase is awaiting either a project or a pillow. I have yet to decide!
The white with floral embroidery is a heavy linen-like fabric. The embroidery was done by my great grandmother, Alice.
The white lace-edged pillowcases I found at a Salvation Army store - hooray for a pair! I use them regularly for their intended purpose.
I have three twin sized sheets and a few pillowcases in the pink and blue pansy print. I found these at different garage sales and thrift stores. These are my favorites, I think! They come with me as sleeping bag liners when I go on women's retreats with my mom.
 The blue/green/white/aqua daisy print is a twin sheet that I found in my mom's collection. Very flower-power.
You can see the top corner of a set of two white-on-blue daisy print pillowcases that I found at Salvation Army. I also use these two as regular pillowcases - you can see them better in the bottom right corner of the first picture in this post.
The yellow and brown floral (very retro, I know!) is a complete full size set with two pillowcases (purchased at different times). Most of the set is very silky-smooth and faded from use, but the pillowcase on top is almost new and quite a bit stiffer. Still very smooth fabric.
 And that embroidered pillowcase in the middle? Also the handiwork of my great grandmother, Alice. I never knew her, but I admire her patience and creativity. It's beautiful work. There are two of these, two, and they'll always be pillowcases in my house!
And that is one of my collections. Upcoming: scarves. What do you collect?
Tuesday, July 26, 2011
Southwest Skillet
Super leftover use! Sometimes I masquerade as superwoman, making magical things come out of my kitchen while still having time to sew, clean, do laundry, scrapbook, spend time with hubby, and study.
Ready? This will require kitchen courage and multitasking. Begin on Monday so that you can do all these steps.
1. Shrimp jambalaya night! Use some diced tomatoes, but realize that the 32 oz can is way too much tomatoes.
2. Brown a pound of ground beef earlier in the week. Use something else for dinner instead (namely, cut up the Swedish meatballs from last week and use them in the pasta/creamy basil pesto/broccoli skillet), and refrigerate the cooked beef.
3. Make BBQ chicken drumsticks, mashed potatoes, and broccoli. Leave a drumstick for another night.
4. Have burritos, complete with chicken, diced tomatoes, black beans, and rice. That can of black beans was also huge.
5. Brainstorm. No, I did that for you. Here goes!
6. Make cornbread, using one box mix, one egg, 1/4 c. sour cream and 1/3 c. water. Bake at 350 degrees F for 40 minutes. This deviates from the Jiffy box mix recipe, which requires 1/3 c. milk and 1 egg, mixed, and baked at 450 for 20 minutes. Why? I used up the milk on my cereal this morning and had to improvise.
7. Make brownies at the same time (in a different bowl and pan, of course), stirring in 3/4 c. Nestle's peanut butter swirl chocolate morsels. Mmm. Bake for 40 mins at 350 with the cornbread. (This is slightly underbaked. Gooey; as I like it. Do not taste it before dinner. Do snack on the chocolate morsels and then put them out of reach.)

8. Raid the fridge. Dump half the ground beef into the skillet, followed by the black beans and diced tomatoes. Chop up half a green onion and add that to the pan. Unwrap the leftover chicken drumstick and cut the meat into bite-size pieces. Add to the skillet.

9. Secret weapon: taco seasoning. Sprinkle liberally onto the contents of the skillet. I used about half a packet without adding any water.
(Note: chopped onion, diced garlic, fresh cilantro, lime juice, and/or jalepeños would also be delicious additions)
10. Heat up the contents of the skillet until the green pepper is fork-tender. Taste it to make sure there's enough seasoning. Add more, if you want. I did.

11. Slice the cornbread and spoon the deliciousness on top!

Or, leave it on the side. As you prefer.

Enjoy! Serve with salsa and tortilla chips, if the mood strikes.
And finish off with brownies.
And another slice of cornbread.
Celebrate! You used up the leftovers.
Tuesday, May 17, 2011
comfort food
Since it is a (broken) furnace-like 40 degrees here in western New York, some comfort food was in order. Enter:
Potatoes Au Gratin, a new family favorite.
(adapted from All Recipes.com)
The cheesy goodness is just too much to contain! See the overflowing dish?

Recipe:
5 or so red potatoes, peeled and sliced into 1/4" pieces
buttered 2 quart dish - I used a glass loaf pan
two garlic cloves, minced
3 tablespoons butter
3 tablespoons flour
1 teaspoon salt (and pepper to taste, if you want. I skipped that.)
2 cups milk - skim works just fine
1/2 cup shredded cheddar
1/2 cup shredded mozzarella
1/2 cup parmesan (I used powdered, but shredded would've been yummier yet)
breadcrumbs, if desired
1. Butter the dish. Seriously. I suppose you could use cooking spray or something healthy like that, but who would want to? :o)
2. Peel and slice potatoes, and lay them down in a single layer in the buttered dish.
3. Preheat the oven to 350 F. (The original recipe says 400 F)
In a sauce pan, melt the butter and add the minced garlic. All at once, add the flour and salt, whisking to combine.
4. Continuing to whisk, add the 2 cups of milk. Here comes the waiting game: whisk continuously until the mixture thickens. Not boils, just thickens. Just keep whisking. My wrist got really tired.
5. Once the mixture thickens, add all the cheese and whisk until it all melts. Remove from heat.
6. Pour a layer of cheesy sauce goodness over the first layer of potatoes. Add a second layer and pour on another layer of sauce. Repeat until you're out of potatoes, and make sure every last drop of cheeseis slurped up makes it into the dish. I added a topping of Italian seasoned breadcrumbs here, but they disappeared with baking. Ineffective, I guess.
7. Line a baking sheet with aluminum foil to prevent the awesomeness of cheese from coating your oven's wire racks. Place the glass dish on the baking sheet and cover with more foil.
8. Bake at 350 F for 2 hours, or at 400 for 1.5 hours. Check partway through to make sure it's not spilling over.
9. EAT!

Potatoes Au Gratin, a new family favorite.
(adapted from All Recipes.com)
The cheesy goodness is just too much to contain! See the overflowing dish?

Recipe:
5 or so red potatoes, peeled and sliced into 1/4" pieces
buttered 2 quart dish - I used a glass loaf pan
two garlic cloves, minced
3 tablespoons butter
3 tablespoons flour
1 teaspoon salt (and pepper to taste, if you want. I skipped that.)
2 cups milk - skim works just fine
1/2 cup shredded cheddar
1/2 cup shredded mozzarella
1/2 cup parmesan (I used powdered, but shredded would've been yummier yet)
breadcrumbs, if desired
1. Butter the dish. Seriously. I suppose you could use cooking spray or something healthy like that, but who would want to? :o)
2. Peel and slice potatoes, and lay them down in a single layer in the buttered dish.
3. Preheat the oven to 350 F. (The original recipe says 400 F)
In a sauce pan, melt the butter and add the minced garlic. All at once, add the flour and salt, whisking to combine.
4. Continuing to whisk, add the 2 cups of milk. Here comes the waiting game: whisk continuously until the mixture thickens. Not boils, just thickens. Just keep whisking. My wrist got really tired.
5. Once the mixture thickens, add all the cheese and whisk until it all melts. Remove from heat.
6. Pour a layer of cheesy sauce goodness over the first layer of potatoes. Add a second layer and pour on another layer of sauce. Repeat until you're out of potatoes, and make sure every last drop of cheese
7. Line a baking sheet with aluminum foil to prevent the awesomeness of cheese from coating your oven's wire racks. Place the glass dish on the baking sheet and cover with more foil.
8. Bake at 350 F for 2 hours, or at 400 for 1.5 hours. Check partway through to make sure it's not spilling over.
9. EAT!

Subscribe to:
Posts (Atom)