Showing posts with label knitting. Show all posts

Wednesday, October 9, 2013

toddler mittens

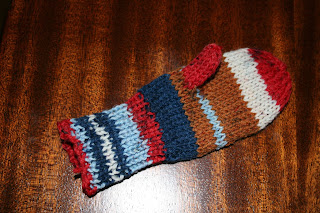
Baby Joshua has a new carseat - one without a snuggly "bundleme" cover - and winter is coming! He already has a cute winter coat and a hat, but he needed mittens. Solution? Knit some!

Most baby mitten patterns are for thumbless mittens, because little ones aren't yet ready to use their thumbs most of the time. However, my toddler has begun to pick things up with his thumb and first finger, and I'm sure he'd be frustrated if his mittens didn't have a thumb. So, as usual, I've modified a pattern to make it work for us. I started with this pattern, making some changes.

First, I've added some length the the cuff, as an attempt to keep these mittens on Joshua's busy hands. I knitted 20 rows instead of the 8 recommended. This will allow me to fold the cuff over so that it's a bit more snug on his tiny wrist.

Second, I've added a thumb! I knit 8 rows in stockinette stitch after the ribbing. Then, at the beginning of row 9, I took a piece of scrap yarn in the same weight, and knit four stitches with the scrap yarn. I then placed the four new stitches back on the left needle and switched back to the main yarn.
please excuse the poor quality picture from my phone!
This created a thumb hole with 8 live stitches for me to knit later. When I had finished the mitten, I picked up four stitches above and below the scrap yarn, and then knit eight rows in the round. Then I knit two together all the way around, cut the yarn, and drew it through the stitches to finish it off.

Third, I finished off the main part of the mitten with kitchener stitch, rather than by drawing the yarn through the stitches. This way, I created a flatter mitten top.

Finally, I made I-cord to attach the two mittens. I'll thread the mittens through the sleeves of his jacket to keep them from getting separated. I hope this will also keep them on his hands a little longer!
Again, another phone picture.

 What do you think?


Linking up to Sew Much Ado's "We Did it! Wednesday" linky party
BLOG TITLE

Tuesday, October 1, 2013

Gratifying

It's a rather gratifying thing to see things that I've knitted actually being enjoyed by someone...especially someone I love!

 Joshua is finally able to enjoy the knit blanket I made for him to play on. Hooray!

Wednesday, September 18, 2013

knitting for my little one

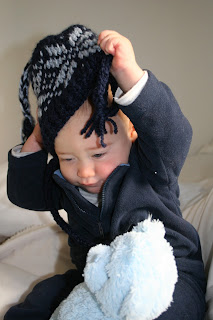
I made this hat for Joshua well before he was born, intending that he wear it this fall. And it fits! However, little guys don't so much like to keep things on their heads, regardless of how stylish they are, and my grandmother wisely suggested that I add earflaps and ties to keep it on his head.

pestering the cat, as usual
I finally got around to doing that just yesterday, and here is the finished product on my sweet baby's head.


And how?(Warning, knitting abbreviations ahead.)

Pick up 9 stitches on one side of the hat.
K five rows in stockinette stitch.
On the right side, K1, K2tog, K to three stitches before the end, ssk, K1. (7 stitches)
Purl 1 row.
K1, K2tog, K to three stitches before the end, ssk, K1. (5 stitches)
Purl.
K1, K2tog, s1, return two stitches to left needle, K2tog, K1. (3 stitches)
Purl.
Knit.
Using the three remaining stitches, continue knitting to form I-cord. Add a cute little tassel.
Repeat on the other side!


Friday, September 13, 2013

manual mode morning

Because Kristen asked about it, I figured I could share a couple of my pictures. I have been experimenting with manual mode, but I have soooo much to learn. Here's from this morning:
 Joshua is wearing the sweater that his Great Grandma Landin made for him :) So fun!


Friday, September 28, 2012

more knitting for baby

Our adorable little guy will also have an adorable little hat:
Thanks to my knitting friend, Kelly, who wanted me to try out her new pattern, I had both the motivation and inspiration to make it! I used scrap yarn and added the striping detail, but followed the rest of her pattern. I love how it turned out, and I can't wait to see our little guy wearing it!

I really enjoyed the pattern, and it will soon be for sale on her Etsy site, where you can also buy the cute hand-knit toys and accessories that she makes. She's a lovely friend and a fabulous knitter! And she inspires me to knit more.

Wednesday, September 26, 2012

charity knitting

I like knitting for other people. It's somehow harder to knit for myself - like the time is better used if I can give something away!

Each year, I knit things to give to my family members as Christmas gifts, and I like to try to fit something in to give to a charity. This year, I found the Red Scarf Program, which is part of Foster Care to Success. The organization helps college students to feel loved and warm on Valentine's Day each year by sending a red scarf to each student that has been in foster care.

Here's what I came up with:

A squishy, soft infinity scarf!

I happened to have some red acrylic yarn in my stash that was looking for the perfect project. Paired with a reddish brown mohair, it makes a cozy scarf!

I knit in a basic basketweave pattern, using big needles to allow the mohair to stay lofty. It didn't take long to finish because of the bigger needles!

To finish the scarf, I seamed the finished edges together, creating an infinity scarf. It will be so cozy - worn once around the neck, or twisted double for extra warmth. The college student bonus is that both of these yarns are machine washable, and therefore, late-night (or early morning) coffee-run friendly.
I hope and pray that the student who gets the scarf feels cozy and warm! I wish I could hug you and tell you that you truly are loved.

Basic Baby Hat

I've been knitting like crazy here, and I love it!

The most recently finished project is a really basic baby hat.
I used a self-striping sock yarn, and I like how it turned out. Would you like to knit your own?


Basic Baby Hat

Materials:
Less than 1 skein sock yarn or other lightweight baby yarn. I used Lion Brand's Magic Stripes yarn.
US size 4 straight needles or dpns

Gauge:
6 stitches per inch in stockinette stitch

Notes:
This pattern is knit flat, but could easily be adjusted for knitting in the round. To knit in the round, CO 72 instead of 74sts, join for knitting in the round, and then k1p1 around for 8 rounds. Follow pattern as written.

Pattern:
CO 74 stitches using the long tail cast-on method, and leaving at least an 8" tail.
Row 1: K2, (p1, k1)repeat across to establish 1x1 ribbing pattern
Rows 2-8: knit in pattern
Row 9 and following: knit in stockinette stitch until piece measures 4" from the cast on edge.

Decreasing:
Row 1: (k8, k2tog)repeat across
Row 2 and all even rows: knit even in stockinette
Row 3: (k7, k2tog) repeat across
Row 5: (k6, k2tog) repeat across
Row 7: (k5, k2tog) repeat across
Row 9: (k4, k2tog) repeat across
Row 11:(k3, k2tog) repeat across
Row 13:(k2, k2tog) repeat across
Row 15:(k1, k2tog) repeat across
Row 17: k2tog across

Finishing:
Draw a 6" tail of yarn through remaining stitches and pull tightly, fastening off.
Seam the sides, from the ribbing to the top, using the 8" tail from the cast-on and mattress stitch to create an invisible seam. What's mattress stitch? Find out here.


Let me know what you think! Link back to my blog if you try it, please! 

Thursday, August 30, 2012

Scandinavian snowflake hat

I made a hat! More knitting for our baby boy, of course.


I'm working my way through my yarn stash, trying very hard not to purchase anything new. As long as I keep my little feet out of craft stores and my mouse away from the Lion Brand website and Ravelry, we'll be good.

There was almost a full skein of navy blue acrylic yarn. I seem to remember purchasing it on a music ministry team trip in college, but I can't remember what the brand was...I only know we were at Wal-Mart. Funny. The light blue yarn is what was left of a Patons acrylic tweed skein that I bought to make infant hats for the little twin boys I watched when we lived in Ithaca. Together, the two colors look great! At least, I think so!
 
The hat is a toddler size, and will be just right for next winter, I hope. I borrowed the snowflake chart from this pattern, and I think I may retroactively add earflaps to my improvised hat pattern so that it looks a bit like this one. The tassel on the top was fun to knit, and an easy way to finish the project. The hat is thick and cozy - just right for our snowy winters. What do you think of it?


Thursday, August 23, 2012

knitting for baby

It's so fun to have a reason to knit, long before Christmas presents are calling for completion. It has also been wonderful to have some cooler weather in the evenings - makes holding yarn and needles a wonderful thing!

About a week and a half ago, I cast on for this vest, using some gray Lion Brand Cotton Ease yarn that I had purchased on sale somewhere a long while ago. One skein was missing a paper label, but I don't generally see that as a big deal when I'm paying, oh, $1.50 per skein. Especially since the full price on Lion Brand's website is listed at $7.69 per skein. Yeah. Not a bad deal.

So, I forged ahead and cast on. I love knitting with cables, and was so pleased at how the back of the sweater turned out.
Here's the back of the sweater, before ribbing was added to the sleeves.
I chose to knit the 12 month size so that Baby can wear it next autumn all the way through the spring. I'm thinking it might make a really cute Thanksgiving/Christmas/Easter outfit, depending on how fast the little guy grows. I also decided to leave out the buttons at the shoulder, because the v-neck looks big enough to stretch over a baby head without too much trouble.

The vest is made in two pieces - front and back - and then is sewn together before the ribbing around the arm holes and v-neck is added. I ran out of my first skein of yarn halfway up the v-neck on the left side, and joined the new skein. I knit the other side of the v-neck, seamed the shoulders and sides, and only then did I realize...

...these two skeins of gray cotton are two different dye lots.

Translation: the color is not an exact match. It's subtle, but I can see it, and it's frustrating. However, there is no way that I'm ripping out that much of a sweater; I'd have to undo the perfectly seamed sides (thankyouverymuch) and knit the entire front again. Not happening. Not until the next time I make this sweater.

In typical Linnea style, I just continued with the pattern, adding the ribbing at the arm holes. Cute.
Then I picked up stitches for the neck line, knit the five rows of ribbing as prescribed and had a second frustrating realization: there are no instructions for a decrease at the v-neck to make the ribbing lie flat.
This time, I did rip out stitches - but just three rows. I did some decreasing at the point of the "v" - as neatly as I could - and tried to make it work. I think it was somewhat successful.
See? Somewhat successful, almost-flat v-neck trim.
Most of my disappointment at this point is because I had hoped that this little project would be an exquisite heirloom, destined to be passed down from our Baby to his baby to the next baby... as long as it would last. It's really cute, but not perfect. Not a complete failure, but still sad.

I do like it, though. And I'll try again...but not for a while! Now, it's on to other little projects.

Saturday, August 18, 2012

little things

It's well past time for a post on the little things.

Things like:

1. My impatiens and begonias in shades of pink and white are thriving and filling out that little city corner just outside our apartment. Morning glory vines are climbing through the chain-link fence, and pink-and-lime green coleus is brightening the edge of the garden.
2. A lovely mix of sun and crisp, cool breeze today, shared with a friend at my husband's football game this morning.
3. The riot of color, sound, fragrance, and texture in fresh blueberries, concord grapes, heirloom tomatoes, brilliant sunflowers, fresh-cut basil, bustling crowds, the empanada stand, a mandolin player with an open case of change, cool, smooth brown eggs, the weight of a full grocery sack, and the laughter of friends at the public market this morning
4. Having enough to eat and drink today - a blessing I often miss. And having food I like!
5. The cuddliness of my Norah-cat, who usually prefers playtime over petting
6. The exciting anticipation and the rhythm and comfortable pattern of knit, purl, knit, cable, knit as I make a vest for our baby boy - and feeling his kicks and twists as I knit.
7.  A normal day - a day where I wake up next to my peacefully sleeping hubby, notice the sun streaming through the blinds, feed the cats, ride in the car, enjoy friends, prepare and eat meals, and relax at home - a day where nothing went wrong. A day of safety, peace, fun, rest, joy, comfort.
8. Owning a vacuum that works well. It's a relief to know that I can trust it to get rid of most of the scattered kitty fur and dust.
9. The convenience of having the internet at my fingertips whenever I need it
10. The comfort of knowing that everything will be okay, because Someone Bigger is the one in whom all things hold together.

And those are just a few of the little things. What are you thanking God for today?

Wednesday, August 15, 2012

knitting for baby

I've just finished a soft, squishy square blanket for our baby boy!

I used this pattern, and Lion Brand's "Hometown USA" yarn. It will be easy to wash, so baby can play on it without me worrying about damage from spit-up and diaper blow-outs. Gross, right?


It still needs some blocking, of course. But I like it! What do you think?

Monday, May 7, 2012

best dressed baby

We're going to have the best dressed baby, for sure!

It appears that "Great" Grandma Landin is also super-excited for our baby to arrive!
Baby already has beautiful white booties:
...and Grandma's special stripey socks. So cute! Baby will match Mommy!
....and a beautiful ducky-yellow cardigan for Baby's first autumn!
Look at those precious buttons! I love the nubbly texture of the yarn, too. Can't wait to put it on Baby!
Thank you, Grandma! We know you love our little one already, and we can't wait for you to meet him or her. What a blessing!

Tuesday, March 27, 2012

spring knitting

Quite a while ago, my mom found a lot of red merino wool yarn at an estate sale, and she bought all of it for me! At fifty cents a skein, it wasn't a bad price. I've been enjoying making things out of it - here's the most recent project!

It's a spiral-y, ruffly scarf. It's light and airy, but still warm - just right for spring! I found the pattern on Lion Brand's website. It's called the Spiral 'Ruffled' Scarf. They recommend using a thicker yarn for most of the project, and then switching to mohair for just the outside edge of the ruffle. However, I used mohair for the entire project, making it a much lighter weight scarf!
Here's the ruffle scarf, folded in half, with the ends tucked through the loop!
The construction of a ruffle in knitting is really ingenious. For this one, at least, you cast on 100 stitches - this is the length of the scarf, rather than the width. Then, increases are made by yarn overs (abbreviated yo) for ever stitch in the first row, doubling the stitches. The stitches are doubled twice more for about 800 stitches! The rapid increases make the fabric appear to ruffle as it spirals on itself. Neat! I like the pretty pattern that is created by the yo - lots of lacy eyelets in the fabric.

Friday, January 13, 2012

Darn. Or, On Fixing Things.

Use it up,
Wear it out,
Make it do,
Or do without.

Good advice, yes? Being on a budget that's less than what I was accustomed to is an adjustment. I'm sure you know how this feels. While we're in this place, and really, throughout our lives, it just makes sense to practice things like Using All the Leftovers, Not Buying Ridiculous Numbers of Sweaters, Dealing With Imperfect Furniture, and Living Without "Essentials" Like T.V. You're probably also couponing, meal planning, freezing, canning, green-cleaning, and creatively stretching your funds in ways I haven't thought of! Do share, by the way!

This is one reason I enjoy looking to the past, embracing my vintage Pyrex collection, appreciating the excellent craftsmanship of vintage fabrics, and picking up other various useful household items that once had a life somewhere else, in another Time. They're often better made, have ingenious uses, and are just plain lovely.

In that same spirit, I want to share with you today How to Darn.

Yes, that's a legitimate use of the word. Darn! It's a verb.

When our great-grandmothers spent long hours knitting socks, sweaters, and other clothing items, throwing away wasn't an option. Instead of getting rid of a sock or sweater or hat or whatever that had a hole, they would fix it and keep using it, not unlike how we patch a pair of beloved jeans. This technique also works on jeans and woven fabrics. Just be sure to have a heavy needle and thread ready!

I have a pair of light lavender/pink cashmere gloves, and the thumbs have worn really thin, to the point of creating holes. I also have a beautiful pair of gray wool cabled mittens from my Grandma, which are so loved that their thumbs have holes, too. Sad day:
 
Here's how I fixed them, and how you can fix (almost) any other holey knit item.

1. Find a long length of a similar color thread or thin yarn, and thread a needle.

2. Observe the pattern of the fabric. See the little V's all stacked on each other like a chevron pattern? Excellent. In between each half of a V is a horizontal thread. If you stretch the fabric, you'll be able to see these horizontal threads making a ladder-like pattern.

3. Starting about 2" away from the hole, begin to weave your thread over-under-over-under the horizontal ladder threads, hiding it between the halves of the V's. Like this:


If you're working with something small, like a glove or sock, it's helpful to put something inside - your hand in the glove, or an old incandescent light bulb in the sock - to be sure you're not picking up fabric on the opposite side of the garment. Women of old actually had a wooden darning tool shaped much like a light bulb...

4. As you approach the hole or weak area in the fabric, draw the thread straight across to the other side of the hole, being careful not to pull it too tightly. You want the fabric to continue to lie flat, without rippling it.

5. Change directions, working so that you have many vertical lines of thread crossing the weak area or hole. Like this:

6. Now, begin to work horizontally, weaving the thread over-under-over-under the new threads you've added and the existing threads (if there are any). Like this:
Continue working until the entire hole is covered, or until the weak area is strengthened.
7. Halfway there!
8. Rather than tying a knot in the thread (which can add unnecessary bulk to the fabric), find another column of V's and weave it in and out of the horizontal ladder threads for about 2". Cut the tail of the thread close to the work, being Very Careful not to cut the fabric.

Done darning, darling!

9. Admire your work and continue to use your favorite gloves, hat, mittens, scarf, sweater, whatever - in the knowledge that you not only saved some money, but that you have a connection to your history, and to people of all times.

On the gray mittens, I used yarn on one thumb, and thread on the other. Both blend in well - you decide what you like best for each project!
On the lavender pink gloves, you'll notice that the left thumb is puckering a little. This is not because it's extra flirty, but because I pulled the threads too tight: a word of caution. It still fits just fine, but isn't perfect. Just like me. :o)
Well, what are you waiting for? Go fix your favorite knits!

Tuesday, January 3, 2012

little things

Some little things today that made me smile:

Sunshine on sparkling snow, and no reason to drive in it. hooray!

Norah kitty voluntarily snuggling with me...


Oscar kitty cuddly as always...


Knitting a scarf for charity - almost done. I almost fell asleep on the couch during this project, though. It was cozy with Norah-Dora on my lap and fuzzy yarn in my hands.

Altering and then wearing an Aran sweater vest I found at a secondhand shop, along with a scarf and hat set I got at that swap meet back in May. The vest was a rather spontaneous purchase - I was on a wintry walk with my mom, sister, and a family friend, when we passed the shop window. I knew it was for me! It just needed to be a little smaller. I made a Linnea Out of Clothes so you could see:
I'm cute and cuddly, friends. Just like the penguins from the Madagascar movie. Cute and cuddly.

Choosing some new music to study this semester, and subsequently deciding to be excited about it.

Enjoying a microwaved s'more on cinnamon grahams. Yay! Perfect follow-up for a healthy meal of tilapia, avocado slices on wheat toast, and parmesan-sprinkled spinach, you see.


Loving my new gold nail polish! Conductors and pianists don't get to wear polish often, you know. Winter break and summer break present excellent opportunities for this little indulgence!
 
Hubby told me I should buy something little for me to enjoy, since I'm always buying or making little things for him (cookies, this last time). $2 well spent, I think.Thank you to the hubby, and to Wal-mart for meeting my budget requirements.

Hanging and turning on my new Swedish welcome star - love. Thank you, Grandpa and Grandma!

I'm feeling a little less burdened by my cold. Thankful for medicine, extra sleep, and vitamins.

Listening to a Bach motet and singing along - at least, as best I can with this cough I'm struggling to get through

Having (many cups of) tea in many varieties - hooray for Twinings.

And those, my friends, are just the little things. I am blessed - may I never forget.