Showing posts with label cards. Show all posts

Wednesday, June 20, 2012

card making craftiness

The month of June is front-loaded with anniversaries, followed quickly by Father's Day. That means a lot of card making!

Here are some of the results:


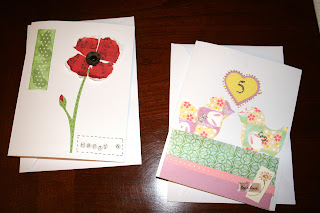
These two anniversary cards turned out pretty cute!

This poppy-inspired one was fun to make - I first tore red music-printed scrapbook paper into four petals, ripping so that some white showed along the edges. Then, I cut a circle of dark purple-gray metallic paper into a circle, and cut fringe all along the edges. I put it all together with a black brad in the middle. Ta da!

This one is for my good friend, Sarah, and her husband, Stephen. See the little glittery "s" sticker I used for each of the birdie wings? I drew a bird silhouette on the back of a piece of (bunny print!) origami paper, and then cut two at a time (right sides of the paper together to make the birds face each other). I must have been in a fringe-y mood that evening, because I decided that they needed to sit in a bed of green grass.

And now, the Father's Day cards!


These two cards were time intensive! I made two of the tree cards - one for my dad, and one for Hubby's dad. We were planning to see Hubby's grandfather that weekend, too, so he got an extra-special card, as well.

For the tree card, I drew a leaf shape on the back of a piece of card stock, then traced it six times on a scrap of textured green card stock. I saved some time by cutting out of three types of paper at once - that's a lot of leaves!

I then free-handed a tree trunk, fashioned from brown textured card stock. Cut two! The next part - gluing all the little pieces in place - took some time.

The argyle Grandpa card was the most time-intensive card I've ever made, I think! I first had to look up the proportions of a rhombus. Geometry was a long time ago! For those of you who are like me and maybe don't remember, a rhombus, or diamond shape, can be created by four right triangles. I used four 3-4-5 triangles (Pythagorean). Do you remember this formula? a2 + b2 = c2

It means that you can figure out the length of each side of the triangle, because the smallest side, multiplied by itself; plus the next largest side, multiplied by itself; equals the longest side, multiplied by itself: 32+42=52 (ahem, 9+16=25). This is derived from the Pythagorean theorem, fellow math friends.

I kept it simple, and decided to follow the formula rather literally. So, each one of my triangles was 3/4" on one side, 4/4" (1 inch) on the next, and 5/4" (1.25") on the longest side. Bear with me as I sketch a drawing in Paint to explain.
 

There we go. You can see now, I hope, that a rhombus is made up of four right triangles. I showed the dimensions of mine in this picture (3/4", 4/4", and 5/4"). If you do what I did, you'll end up with a diamond shape that's 2" high, 1.5" across, and 1.25" on each diagonal side. Cool, right?

I traced my rhombus template onto four colors of card stock (these colors remind me of golf clothes - buttery yellow-cream chinos, orange polo shirt, brown saddle shoes, and blue caps), and cut away! I like the way the design turned out. To make the gold dots on top of the diamonds, I measured the center of each long side, putting a pencil dot at the 3/4" mark. I then used my trusty ruler to keep the dots 1/4" apart, and dotted away!
Do you like it? Would you try it? In a box, with a fox? (Seuss reference, friends.)

Friday, February 10, 2012

a little love

Early last month, I began preparing for The Valentine's Day Card-Making Girls'-Night-In.

It didn't work last year - no one could be there, and admittedly, I started a little too late to find a free night in most ladies' schedules. But this year, it was successful. And so fun!

First, there were cupcakes. They were confetti cupcakes covered in homemade chocolate icing. Linnea tasted and saw that it was good, but then decided that they most certainly needed handmade heart-shaped picks to be complete. True?
True, indeed.


And then there was the trip to the dollar store for conversation heart candies, which found their way onto these sugar cookies:
Here is the point at which I am most grateful for the Betty Crocker sugar cookie mix packages. They're so easy. The cookies don't require refrigeration before they can be rolled out, either = genius.
I had fun choosing the candies for each heart to say something creative, as you might imagine.

Here are two of the ladies that joined me for card-making and consumption of copious amounts of chocolate - note the counter full of goodies.
We enjoyed chocolate milk (thanks, Sally!), chocolate coconut cupcakes (delicious, Jamie!), amazing cream cheese sandwich cookies and jelly-filled heart shaped cookies (many thanks to Jennifer), in addition to the two treats I showed you above.


We also had time between bites to create Valentine's Day cards. This was guise under which we got together, and it was quite an effective ruse for the eating of chocolate and the neglecting of homework and the hours of conversation.
See? Productive. And cute! Look at Jennifer's card for her hubby:
And Jamie's for her husband:
Sally left before we could get a group picture. It was, admittedly, rather late at night by this point.

Still silly and sugary sweet.

Here are the cards that I made for my sister, sisters-in-law, MIL, and my mom:

I love how they turned out! Sally brought some really beautiful paper that she made, and I loved adding that to my cards. I did some hand sewing to add an extra special detail to the lace, too.

Thursday, December 22, 2011

string wrapped presents and cards and cookies!

Do you get as excited as I do about giving gifts? I love to find just the thing, and then to see the surprised, happy look on the person's face. That's pretty special! (I bet that's how God feels about giving gifts to us, too...)

Part of what gets me excited about the gift is how it's presented. Extra time and creativity put into the wrapping just makes it feel full of thoughtfulness and love! This is why it takes me a good week to wrap Christmas presents. I just want each one to look great on the inside and the outside!

This year, I closed some of the tissue-wrapped interiors of boxes with monogram stickers or letters to spell out the person's name. I added jingle bells to some, made individual gift tags, even made some of the gifts!

Each year, I like to go to the post-Christmas sales and pick up cards, wrapping paper, ribbon, tissue, and anything else to store for the next year's wrapping. I'm pretty good about guessing how much I'll need, but this year, I ran out of ribbon! Gasp!

I saw this idea somewhere, possibly here? and it sure came in handy. The last presents to arrive in the mail this year were for my brothers, and so it didn't really matter that I was out of ribbon.
(Shh... let's pretend I meant to do this all along. Yes.)
I wrapped the present in the middle with the last of the gold metallic kraft wrapping paper, and had a wide strip left over. Then, I wrapped the other two in kraft paper, using the leftover gold strip as a wide "ribbon" across the middle of each. For the gold-wrapped package, I added a strip of leftover plaid wrapping paper.

Next, I wrapped red cotton string around and around and around and around one of the kraft wrapped packages. It really didn't take very long!
The spool of string sat nicely on one of the dining room chair posts. Norah-kitty was rather delighted by this. I remembered that I have metallic gold thread, so that went on, too. Tucked in a tag, and it was done!

For this one, I first wrapped red around the middle, being careful to line up each wrap of string with the next. Then white cotton string went around the outside of the red string, followed by gold thread and another wrap of red. Pretty!
The last present is for my handsome husband. His gold-and-plaid wrapped gift was finished off with a wrapping of red and green string, with some gold metallic thread to give it a bit of sparkle.

On to the card! I feel like with each card that I made this year, I got more and more creative. I love the way this one turned out! Merry Christmas, Sarah P.!
My friend, Jamie Z. came over for cookie making and tea last Friday, and these are some of my favorite cutouts.
I took waaaaay too much time on my Santa cookie, but I love how it turned out! Look at the little wrapped present and teddy bear in Santa's sack of gifts!
This Scottie dog was supposed to have a plaid blanket, and this is the best I could do! I'm pleased.
Throughout this week, I've also made a second batch of cutout cookies, Swedish ginger cookies, pumpkin pie, and Spritz cookies. I promise I haven't eaten more than...five? or six? Most are wrapped and ready to give! I wrapped some in parchment paper, tied with red and green string, and tagged with a festive fabric label.

Did you know that tape won't stick to parchment paper? Yeah, neither did I. So that was tricky, but I like how it turned out!

So with that, Merry Christmas, friends! I hope yours is full of peace, joy, and love.

Sunday, December 11, 2011

crafted Christmas

Being a grad student means I have a lot less time to do crafts. I miss that!

However, holidays require decorating. They just do. So I bow to the pressure (read: neglect the vacuuming and dishes) and create. Cards, garland, card hanging garland, table decorations, more cards, decorating cookies, knitting, making other things. Here are some of the projects that have consumed my spare moments.

I am particularly proud of these two cards! I made a bunch more, but I love how these turned out.
Two of my favorite cards
This one I am very proud of - I drew and cut out those letters and shapes!
This evergreen swag was made by my mom and left "blank" for me to personalize with ribbon. etc. I'm not there yet, but I have some ideas!
I made my card-hanging garland this year out of three strands of cotton crochet string. I "chained" it as long as I wanted, using my fingers instead of a crochet hook to get that loose, open look. The cards are just taped onto the string. I hung the garland with tiny picture nails so that it could support all the cards!

This is my sparkly pine cone centerpiece, which currently has a lovely life on my breakfast bar.
Never mind all the flash reflections in the ornaments!

This garland is made of felt circles (ridiculously hard to cut, by the way) and red cotton string. I like how light and airy it looks! The kitties are pretty sure it's a fabulous toy made especially for them. Frustrated about that. This, by the way, is the same reason we don't have the tree up this year.
I made bird seed ornaments, following this tutorial. These are for my father-in-law, gifted with an Audubon Society bird identification book! I hope he'll love them.

Anyway...soon, there will be Christmas cut-out cookies (as requested by my husband), and present wrapping, and more knitting and...

...this girl must first finish her final exams.

Saturday, October 8, 2011

creativity and sunshine

I'm absolutely loving this sunny fall weather! Blue skies, perfectly colorful leaves, and the warmth - but with that crisp, autumn scent. Bliss.

I had some fun today packaging up a gift for my husband's cousin, who will have a baby girl in December. I made some cute pink booties for her, and bought a 1963 vintage copy of a Little Golden Book to use for the "card." But the book should have a bookmark, so I made one. Then I got a little more inspired, and wrote a poem about learning to read. And then it had to be on a scrapbook page... you know how this goes!

First, the booties. Pink acrylic yarn, Mary Jane strap, pink flower button. Cute!
And the book, with the bookmark:
Inspiration - there must be a poem! Enter the scrapbook page, ready for a photo of the new baby princess when she arrives.
Here's the text of the poem that I wrote on her scrapbook page:
---
As you learn and grow and play
finding wonder in each day,
may letters and words unlock for you
stories, dreams and questions new,
leading you at last to find
that you're a treasure in God's mind.

In the Bible, words for you,
words of love, strong and true:
Jesus died to make you free;
lives again, your Friend to be.

--- Linnea L. Burr, 2011

Tuesday, June 7, 2011

today's creative hours

I realized that I'll be rather busy this summer, and I took the time today to make the greeting cards I needed for the rest of the summer (yay for saving some cash and being creative). Three anniversary cards and four birthday cards later, here are the results:
All of the cards use origami paper. Some use textured cardstock, cut with decorative edges. I used gold poster paint to embellish some, and added floral die-cuts and brads for dimension. A few also use glittery sticker letters. I love how they turned out!


Thursday, December 23, 2010

this is not an endorsement for vistaprint

My husband has his own computer building business, and he asked me the other day to design business cards for him, using the website header that I had created for him. No problem, right? A few minor adjustments, submit to Vistaprint, and voila! New business cards. Nice design. Loving wife does extra-special things for her husband.

I sent him the design at work so that he could preview it. Evidently, he didn't look at it, and I didn't catch the mistake - we had the wrong phone number listed. He and I have very similar phone numbers for our mobile phones, just different by two digits. Guess whose number was on the card? Oh, wait - mine. And I paid for 2-day shipping to the tune of $14. A total waste of $22 - we can't use the cards at all!

Today I tried to contact Vistaprint for a refund of some kind, but their automated customer service doesn't allow the caller to ever reach a real person. Amazing. I'm so frustrated right now!

I uploaded a corrected design (thank you, Photoshop), but this time, it appears bigger than the bleed area. Not okay! So I tried to contact customer service again to confirm whether it will be an acceptable size. I sent an email, and they'll answer me within 48 hours. Seriously? 48 hours? I need these ordered today. They need to come before my husband goes to a conference next week. This is not acceptable!

And I'm trying to calm down, so that, in the event that I actually reach a real live customer service person, I'll be patient, kind, clear, and firm.